If you're catching this via the follow or RSS feeds please check http://www.misterjustin.com/ for the new blog. You'll need to follow or subscribe again.
I'll have content up before long.
Thursday, May 26, 2011
Wednesday, May 18, 2011
I Am Not Dead
I've been a bit busy since the birth of my son in October which, not coincidentally, was the month in which I made my previous post.
But rest assured that misterjustin.com is going to get some love here soon. I am going to move all of the current content into an archive and use this space to focus on weathering techniques and AFV modeling. I was once told that the best writing is done on subjects you're passionate about -- and so you can expect to see weathered tanks, airbrushing techniques and modeling tips.
There will be far fewer tags so that content is easier to navigate and I will include pieces I'm working on for Secret Weapon Miniatures so folks can see what I'm sculpting these days.
-- misterjustin
But rest assured that misterjustin.com is going to get some love here soon. I am going to move all of the current content into an archive and use this space to focus on weathering techniques and AFV modeling. I was once told that the best writing is done on subjects you're passionate about -- and so you can expect to see weathered tanks, airbrushing techniques and modeling tips.
There will be far fewer tags so that content is easier to navigate and I will include pieces I'm working on for Secret Weapon Miniatures so folks can see what I'm sculpting these days.
-- misterjustin
Friday, October 22, 2010
584th Krieg Update: Chimera, Hellhound & Infantry

The Artemia pattern Hellhound is starting to come together. I applied and sanded the decals then did the first round of weathering. I might add more chipping, otherwise pigments are next.

This is the finished Chimera conversion. I'm not entirely sold on the Predator turret but think I'll get it painted before I decide. Unless someone points out a detail I missed I'll move on to modeling battle damage next.

These are the first three infantry test models. They're not finished but I figured they were ready for some feedback.
Next up - back to the mortar team, I think.
Sunday, October 17, 2010
584th Krieg Mechanized Interdicion Regiment

I did a lot of commission work for Niroe (he posts on the Boot Camp forum) on his Krieg army. At one point he had a set of custom icons sculpted and I still have a bunch. When I started doing my Krieg models, and needed to repair the track guard on my Artemia Hellhound, I had an idea...
And so now I'm adding to the 584th Krieg Mechanized Interdiction Regiment!
All of my vehicles will now sport the icons and I'll carry on with his fluff.
This is the first of my set-back turret Chimera conversions. I'll probably be using the Predator turret on these and I'm waiting for one to come from Battlefront Games.
This will join ranks with my Artemia Hellhound, which is where the painted icon came from at the top of the Chimera pic, and my mortar team of course.
More to come....
Thursday, October 14, 2010
Ask misterjustin: Painting Realistic Rock
My "realistic rock" tutorial has been a long running favorite and I've redone it a couple of times now. I figured it was finally time to get it posted in video format though and so here it is!
The technique is a bit rushed in the video as I only have 9 minutes before YouTube cuts me off. But if you want to see additional examples of the finished technique just check out the "Runic Mountain" pressure cast resin bases. I painted the whole lot of them using this technique to create differin styles.
The technique is a bit rushed in the video as I only have 9 minutes before YouTube cuts me off. But if you want to see additional examples of the finished technique just check out the "Runic Mountain" pressure cast resin bases. I painted the whole lot of them using this technique to create differin styles.
Ask misterjustin: Priming Models
After I posted pics of one of my personal projects I had several people ask me why I would prime a model white and then paint it black. It's an excellent question and I'm happy to answer it.
First let me say that you should only apply a very (VERY!) thin layer of primer to your models. I'll look at why below but when I say "thin" I mean that if you're priming white over a grey model you should still be able to see grey through the primer.
If you apply the primer too thickly you'll loose detail on the model and create a smooth layer that will be LESS effective at helping paint to adhere to the model (see 1, below).
Now let's look at why you prime a model:
1. By using a thin layer of primer you create a very slightly rough texture on the model. This isn't the rough texture, often called "orange peel," that you get with a bad primer application but a very thin coating of paint. This thin coating creates tiny, microscopic peaks and valleys that will give the next layer of paint somewhere to rest. This keeps it from flowing more freely across the model and helps stop it from being rubbed off as easily with handling as there is more surface holding the paint in place.
2. Many are the mold lines you'll find when you add a thin layer of primer. This gives you a chance to clean them up, and re-prime just that section, before moving on.
3. By adding "teeth" to the model you can use thinner layers of paint, and thus loose less detail while painting, because it's easier for the second and subsequent layers to adhere to the model.
4. Pre-shading is something I'll cover in a future tutorial as it really is a topic of its own. But if you have a question about it please let me know in the comments or via email.
There are other reasons to prime a model but I won't cover those here. If you have a question I'll be happy to answer it in the comments, via email or with another tutorial though.
In the interim here's a look at how I primed one of the Beveled Edge "Trench Works" 60mm 02 bases.
And that's really it. Tight controlled burst of primer to create a thin layer of "teeth" for the next layers of paint to adhere to.
It's worth noting that the 60mm base in the video is going to be used with one of my models and will eventually be shades of black and brown.
Remember, if you have a weathering or detailing question you'd like answered just drop an email to misterjustin at secret weapon miniatures dot com.
First let me say that you should only apply a very (VERY!) thin layer of primer to your models. I'll look at why below but when I say "thin" I mean that if you're priming white over a grey model you should still be able to see grey through the primer.
If you apply the primer too thickly you'll loose detail on the model and create a smooth layer that will be LESS effective at helping paint to adhere to the model (see 1, below).
Now let's look at why you prime a model:
- It adds "teeth" to help paint adhere to the mode
- It helps in finding mold lines and surface defects
- It allows you to use thinner layers of paint
- Pre-shading
1. By using a thin layer of primer you create a very slightly rough texture on the model. This isn't the rough texture, often called "orange peel," that you get with a bad primer application but a very thin coating of paint. This thin coating creates tiny, microscopic peaks and valleys that will give the next layer of paint somewhere to rest. This keeps it from flowing more freely across the model and helps stop it from being rubbed off as easily with handling as there is more surface holding the paint in place.
2. Many are the mold lines you'll find when you add a thin layer of primer. This gives you a chance to clean them up, and re-prime just that section, before moving on.
3. By adding "teeth" to the model you can use thinner layers of paint, and thus loose less detail while painting, because it's easier for the second and subsequent layers to adhere to the model.
4. Pre-shading is something I'll cover in a future tutorial as it really is a topic of its own. But if you have a question about it please let me know in the comments or via email.
There are other reasons to prime a model but I won't cover those here. If you have a question I'll be happy to answer it in the comments, via email or with another tutorial though.
In the interim here's a look at how I primed one of the Beveled Edge "Trench Works" 60mm 02 bases.
And that's really it. Tight controlled burst of primer to create a thin layer of "teeth" for the next layers of paint to adhere to.
It's worth noting that the 60mm base in the video is going to be used with one of my models and will eventually be shades of black and brown.
Remember, if you have a weathering or detailing question you'd like answered just drop an email to misterjustin at secret weapon miniatures dot com.
Wednesday, October 13, 2010
Krieg Mortar Team
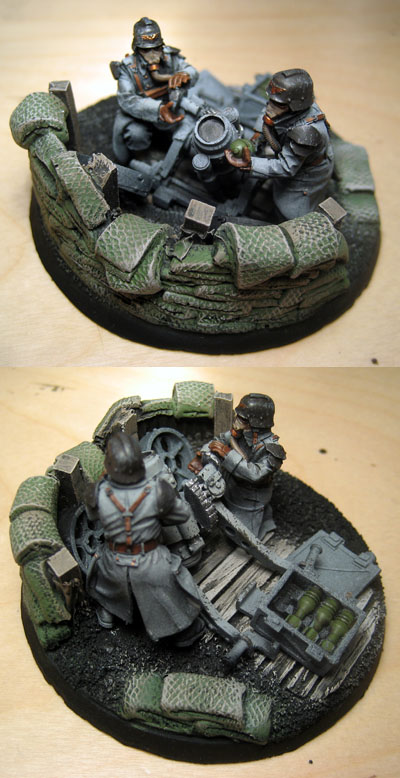
Should I add "wet" snow to the finished base?
I'm a big fan of modeling snow. I'd like to put my Krieg in snow but I'm wondering if folks out there think it will take away from the models.
I'd make it very wet looking snow to blend in with the mud, of course, but...
Thanks in advance for any feedback.
Tuesday, October 12, 2010
Artemia Pattern Hellhound
I've always wanted to paint one of the Artmia Pattern Hellhound models from Forge World. When I added a Hellhound to my army list this month I finally had the excuse I was looking for. Of course my list calls for a pintle stubber... and I forgot that this model can't take one. Oops.
Anyway, on with the show:

The model was washed and then primed with Krylon white primer. After that dried I painted the model black using Games Workshop "Chaos Black" and an airbrush.

The fuel tank was airbrushed GW "Dark Flesh" and then splatter sprayed with "Desert Yellow." This will form the basis for the rust later.

The tracks were taped to avoid painting them grey. In this pic you can also see a set of "Runic Mountain" bases that got rejected -- I won't ship a base with that many bubbles on the bottom :)

The model was base coated GW "Codex Grey" and then painted "Fortress Grey" from the top and 45* on each side. Lastly a spot of "Elf Flesh" was added to the "Fortress Grey" paint to create panel highlighting on the top.

The fuel bay was based GW "Desert Yellow" and then a mix of "Commando Khaki" and "Bleached Bone." I did this to help the fuel bay, which is largely hidden by the fuel tank, stand out a bit and add some additional visual interest.

Using hairspray and salt to mask the rust colours I painted the fuel tank in the same greys as the body of the vehicle. I weathered the top of the fuel tank, where it would be banged during refilling, very heavily. The right photo shows the section closest to the body of the vehicle where it would corrode but receive very little additional damage.

The base coated model with fuel tank in place.

The fuel bay was weathered with sponge applied chipping, oils and pigments. As a final step I mixed up some "oil" and ran it into the bay from the top corners to simulate runoff from refilling the fuel tank. It is, of course, almost entirely hidden once the fuel tank is in place... but it was fun to do anyway.
Unfortunately I forgot to order my Krieg transfer sheet so this is where I'm going to have to stop the model for awhile. Before I move on to anything else I need to get the decals in place. Oops.
My total painting time at this stage is a little more than 2 hours, possibly creeping up on 3.
Feedback is ALWAYS welcome and questions will be answered.
Anyway, on with the show:
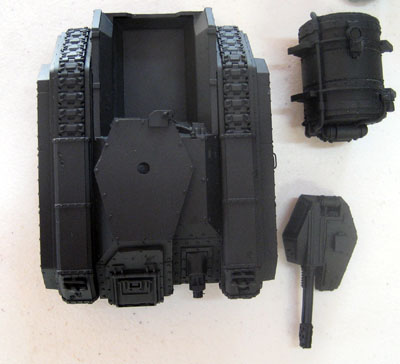
The model was washed and then primed with Krylon white primer. After that dried I painted the model black using Games Workshop "Chaos Black" and an airbrush.
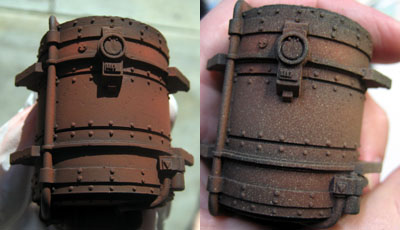
The fuel tank was airbrushed GW "Dark Flesh" and then splatter sprayed with "Desert Yellow." This will form the basis for the rust later.
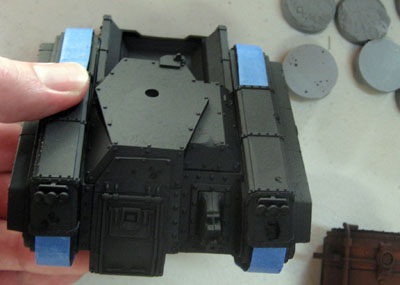
The tracks were taped to avoid painting them grey. In this pic you can also see a set of "Runic Mountain" bases that got rejected -- I won't ship a base with that many bubbles on the bottom :)

The model was base coated GW "Codex Grey" and then painted "Fortress Grey" from the top and 45* on each side. Lastly a spot of "Elf Flesh" was added to the "Fortress Grey" paint to create panel highlighting on the top.
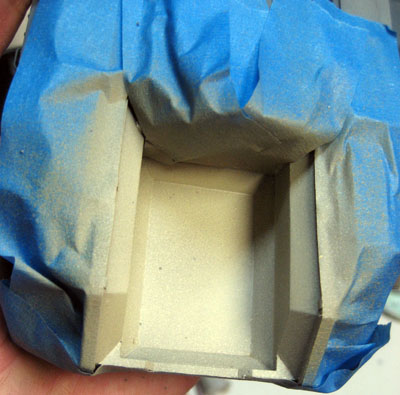
The fuel bay was based GW "Desert Yellow" and then a mix of "Commando Khaki" and "Bleached Bone." I did this to help the fuel bay, which is largely hidden by the fuel tank, stand out a bit and add some additional visual interest.
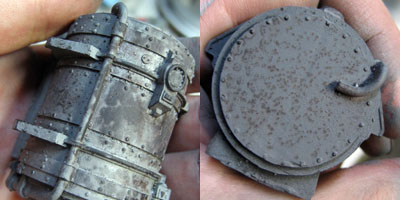
Using hairspray and salt to mask the rust colours I painted the fuel tank in the same greys as the body of the vehicle. I weathered the top of the fuel tank, where it would be banged during refilling, very heavily. The right photo shows the section closest to the body of the vehicle where it would corrode but receive very little additional damage.
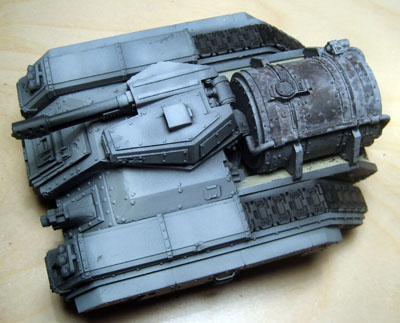
The base coated model with fuel tank in place.
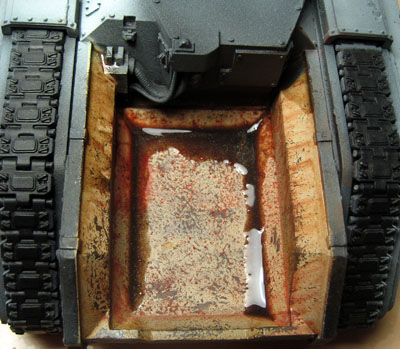
The fuel bay was weathered with sponge applied chipping, oils and pigments. As a final step I mixed up some "oil" and ran it into the bay from the top corners to simulate runoff from refilling the fuel tank. It is, of course, almost entirely hidden once the fuel tank is in place... but it was fun to do anyway.
Unfortunately I forgot to order my Krieg transfer sheet so this is where I'm going to have to stop the model for awhile. Before I move on to anything else I need to get the decals in place. Oops.
My total painting time at this stage is a little more than 2 hours, possibly creeping up on 3.
Feedback is ALWAYS welcome and questions will be answered.
Tuesday, September 21, 2010
Skaven Warlord - Shading Armor & Skin

With the cloth more or less settled I have moved on to shading the bronze armor and his skin. My goal is to have a largely monochromatic model and using the same green on the armor as I did on the cloth has helped.
My feeling at this point is that I need to go back and really re-touch the base colour on the armor. It's too green and the transition is too sharp. I am very pleased with how keeping the light on the armor near his face has helped to draw the eyes there though.
The top shot gives a fair look at the actual shading on the helmet. It was taken with two lamps positioned to eliminate natural shadows. I made the crest very dark to help draw additional emphasis to the model's face.
I might go back and add some additional layers of shadow to the cloth in the folds closest to his belt line. The base colour seems to cover too much of the side there and I want more stark separation.
So next up: more of the same, really. It's all about back-and-forth at this stage.
(you'll notice three new tags in this post - Blending, Metallics and Skin - that will follow this model to the new blog format in coming months. I will focus less on specific types of model and more on specific techniques and PARTS of models.)
Thursday, September 16, 2010
New Tutorial: Weathering Decals
I have posted a quick video tutorial on using sandpaper to weather decals over at the Secret Weapon blog.
This will be the first of many new tutorials as I renew my ties with ++ From the Warp ++ to properly launch the "ask misterjustin" tutorial series.
If you have a hobby related question you'd like to have answered drop an email to misterjustin at secret weapon miniatures dot com.
This blog will continue to focus on my current painting projects - but will also get revamped as I narrow down that scope to make it more useful and relevant to readers and less, "here's what I painted."
This will be the first of many new tutorials as I renew my ties with ++ From the Warp ++ to properly launch the "ask misterjustin" tutorial series.
If you have a hobby related question you'd like to have answered drop an email to misterjustin at secret weapon miniatures dot com.
This blog will continue to focus on my current painting projects - but will also get revamped as I narrow down that scope to make it more useful and relevant to readers and less, "here's what I painted."
Tuesday, September 14, 2010
The Annotated Workspace

If you click through you will also find photos of the additional items to the left and right of my desk. Of course my desk area is only a small part of the overall workshop space -- so I'll get photos of that online at some point too.
Wednesday, September 8, 2010
Skaven Warlord - Shading the Cloth

The moment I saw the new Skaven Warlord in the "Island of Blood" box set I knew I had to have one. In fact I knew I'd have to drop everything and get one painted.
I eeked out a couple of hours today to base coat the flesh and start the shading on the cloth. I tried the first highlight as well but I'm going to scrap the highlight and redo it.
What I'm debating now is whether or not the cloth actually needs to come darker at the bottom. What you see is mostly what you get though -- the photo was taken with top and front lighting. With the exception of a slight shadow in the top pic from his cleaver the painting is, for my first time, not too off in the photo!
I love this model. I can't say it enough. The new "Island of Blood" models are incredible. My bits order included the Warlock too - but I'm not as excited by that.
Feedback welcomed. Questions answered.
-- misterjustin
Saturday, September 4, 2010
Rethinking the site....
Rumors of my death have been greatly exaggerated. Things are going well for Secret Weapon Miniatures and I have a son on the way. There simply hasn't been much time to paint.
This has given me an opportunity to think about misterjustin.com and what I'd like to do with it. In the hope that some of my readers, and now 85 followers, will share an opinion I give you part of my vision:
An "ask misterjustin" segment. This would start monthly and focus on a question on techniques sent in from readers. I love making tutorials and I'd really like to make a regular thing of it. This would likely include video.
If I can get enough interest in this segment I will archive the current posts (all of them) so that the new labels are easier to navigate.
I'll still post what I'm working on but I'll focus on the techniques I'm using rather than just "here's a model" posts.
So, what say you, my invisible audience, do you want me to launch an "ask misterjustin" blog?
This has given me an opportunity to think about misterjustin.com and what I'd like to do with it. In the hope that some of my readers, and now 85 followers, will share an opinion I give you part of my vision:
An "ask misterjustin" segment. This would start monthly and focus on a question on techniques sent in from readers. I love making tutorials and I'd really like to make a regular thing of it. This would likely include video.
If I can get enough interest in this segment I will archive the current posts (all of them) so that the new labels are easier to navigate.
I'll still post what I'm working on but I'll focus on the techniques I'm using rather than just "here's a model" posts.
So, what say you, my invisible audience, do you want me to launch an "ask misterjustin" blog?
Tuesday, July 27, 2010
Ultramarines Tactical Squad

I started work on this Tac Squad for the annual Relic forum competition. I'm using it as an excuse to try zenithal highlighting with an airbrush and to showcase the helmet crest conversion bits from Secret Weapon Miniatures.
The fourth photo down, of the Tac Marine without his gun, does a decent job of showing the airbrushed highlights. Using an airbrush is an easy way to create smooth transitions for directional lighting. The style isn't for everyone but I'm a fan.
I have also included a shot of the sergeant with his squad to show the combination of the Greek and small Roman style helmet crests in action together.
Thursday, July 22, 2010
Storm Wardens Roundup

When I was approached to paint a model and supply bases for the Storm Wardens Project I was thrilled. We set a goal of raising $1,000 for Doctors Without Borders.
Well here is the completed army shot - without all of the extras like custom dice and templates. All of the bases are from the Secret Weapon 'Flagstone' theme -- and I'm very happy to announce that we not only met our goal but exceeded it.
The total collected was
$16,107.00
for Doctors Without Borders!
I kid you not.
My heartfelt thanks go out to all of the gamers that contributed to the project - and to the incredible team of people that made this happen and allowed Secret Weapon Miniatures to be a part of it.
Saturday, July 17, 2010
The Mathieu Fontaine Workshop Ogre

I was lucky enough to spend a weekend with Mathieu Fontaine at one of his masterclass painting workshops. The experience was incredible and this is the Ogre I painted. I'm still not convinced that it's finished - but I'm going to stop here for now and apply the techniques I picked up to other models.
If you get a chance to attend one of these masterclass workshops don't miss it. Really.
My thanks to Mathieu for his incredible help... and patience!
Friday, July 9, 2010
Storm Wardens: FINISHED Land Raider!
 Here it is, my finished contribution to the Storm Wardens Project - raising money for 'Doctors Without Borders'.
More than 600 people have already contributed and there's still one week left to add your name to the roll for a chance to win the entire army -- including custom dice, accessories and a carrying bag!
I'm fairly happy with how the model turned out and took step-by-step photos of the rust in the hope that I'll have time to put together a new tutorial in coming weeks.
Head over to the Storm Wardens Project HQ to see a photo of the finished army -- and remember, more is on the way!
Thursday, June 24, 2010
Storm Wardens: Project Update

The community has rallied behind the cause and over 570 people have made a contribution to the Storm Wardens Project and therefore Doctors Without Borders, our chosen charity. But we know there are many more of you out there who want to contribute!
The basic idea is that when you contribute via the Paypal button on our blogs, you are entered in a drawing to receive the entire Storm Wardens army (in the vicinity of 2,000 points) along with a bunch of great swag - such as GF9 Storm Wardens templates, Storm Wardens dice from Chessex, a Battlefoam bag filled with custom cut foam for the army, and even a couple of Storm Wardens T-shirts so you can wear them with pride as you play the army in your FLGS. The army will be fully assembled (mostly converted) and fully painted by some of the most renowned US hobbyists across the blogosphere.
The final drawing takes place on Sunday July 25, on a Special Storm Wardens Edition of Jawaballs Live!
We also have a lot of other prizes being given away over the course of the build, keep an eye out on Santa Cruz Warhammer and From The Warp each week for information about these bonus prizes, contributed by the community.
Every dollar donated goes to Doctors Without Borders (apart from the PayPal fees of course) as all the other swag (including the original models) have been donated by the painters themselves, by their FLGS, or by a list of other great companies. Anyone, anywhere in the world, can contribute - we will ship the prizes anywhere in the world!
Wednesday, June 23, 2010
Props: Severed Thumb

The production of Macbeth that I'm in was using a cheap magicians thumb as a prop and, never being one to leave well enough alone, I decided to bring it home and have a go at making it look less pink and more grim.
I'm pretty happy with the results and think I got a fair representation of pallid, rotting but recently severed flesh. I filled the hollow cavity with resin and there's blood drying in the small lip and along the edges. I used a nice dark colour on the blood since it would be well congealed and oxidized by this point.
I get to unveil it in a couple of hours for our next dress rehearsal and I'm looking forward to the reaction.
Saturday, June 19, 2010
Storm Wardens: Land Raider pt. 2

My contribution to the Storm Wardens Charity Project is well on its way. There's still time for you to contribute and get a chance to win the entire army. Check out the links on the right to see what the rest of the team - including some big names! - are up to.
As for the model... please forgive the shine - I put down a layer of clear gloss before applying the pigments and the model is very, very shiny. It's finally starting to come together though and I should have it finished early next week.
While I was working on this I remembered a quick tip for working with tank treads: if there's a track guard in place the FRONT tracks will be clean and shiny except in the deepest recesses. Save your heavy weathering for the back of the tank. The track guard will rub the track clean and what you'll be left with up front is a small amount of dirt and rust.
When I finish the rest of the basic detailing I'll come back and apply the pigment weathering to the sides and back of the tank. I'm using "Burning Sands" as the primary colour to help the model work with the pressure cast resin bases - "Flagstone" - that the entire army is standing on.
More to come as I have time.
Subscribe to:
Posts (Atom)