I've always wanted to paint one of the Artmia Pattern Hellhound models from Forge World. When I added a Hellhound to my army list this month I finally had the excuse I was looking for. Of course my list calls for a pintle stubber... and I forgot that this model can't take one. Oops.
Anyway, on with the show:
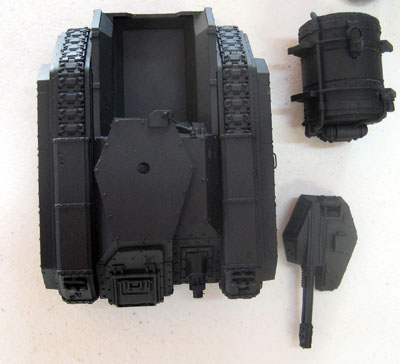
The model was washed and then primed with Krylon white primer. After that dried I painted the model black using Games Workshop "Chaos Black" and an airbrush.
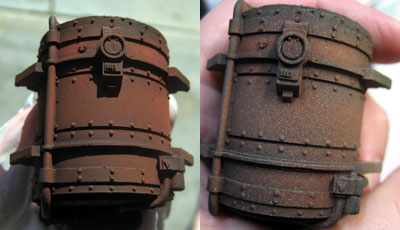
The fuel tank was airbrushed GW "Dark Flesh" and then splatter sprayed with "Desert Yellow." This will form the basis for the rust later.
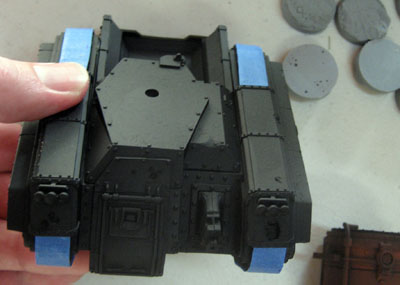
The tracks were taped to avoid painting them grey. In this pic you can also see a set of "Runic Mountain" bases that got rejected -- I won't ship a base with that many bubbles on the bottom :)
The model was base coated GW "Codex Grey" and then painted "Fortress Grey" from the top and 45* on each side. Lastly a spot of "Elf Flesh" was added to the "Fortress Grey" paint to create panel highlighting on the top.
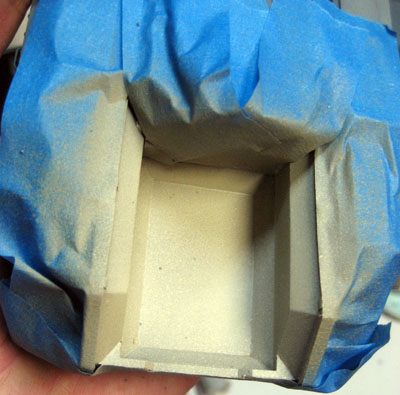
The fuel bay was based GW "Desert Yellow" and then a mix of "Commando Khaki" and "Bleached Bone." I did this to help the fuel bay, which is largely hidden by the fuel tank, stand out a bit and add some additional visual interest.
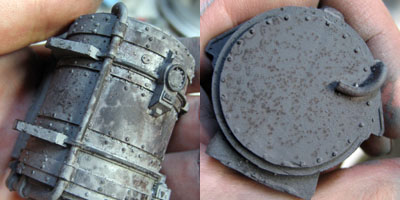
Using hairspray and salt to mask the rust colours I painted the fuel tank in the same greys as the body of the vehicle. I weathered the top of the fuel tank, where it would be banged during refilling, very heavily. The right photo shows the section closest to the body of the vehicle where it would corrode but receive very little additional damage.
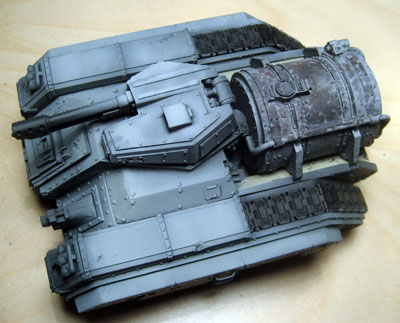
The base coated model with fuel tank in place.
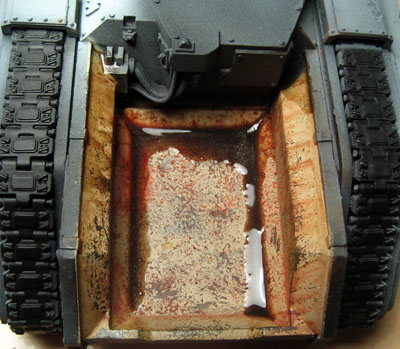
The fuel bay was weathered with sponge applied chipping, oils and pigments. As a final step I mixed up some "oil" and ran it into the bay from the top corners to simulate runoff from refilling the fuel tank. It is, of course, almost entirely hidden once the fuel tank is in place... but it was fun to do anyway.
Unfortunately I forgot to order my Krieg transfer sheet so this is where I'm going to have to stop the model for awhile. Before I move on to anything else I need to get the decals in place. Oops.
My total painting time at this stage is a little more than 2 hours, possibly creeping up on 3.
Feedback is ALWAYS welcome and questions will be answered.
Showing posts with label weathering. Show all posts
Tuesday, October 12, 2010
Thursday, September 16, 2010
New Tutorial: Weathering Decals
I have posted a quick video tutorial on using sandpaper to weather decals over at the Secret Weapon blog.
This will be the first of many new tutorials as I renew my ties with ++ From the Warp ++ to properly launch the "ask misterjustin" tutorial series.
If you have a hobby related question you'd like to have answered drop an email to misterjustin at secret weapon miniatures dot com.
This blog will continue to focus on my current painting projects - but will also get revamped as I narrow down that scope to make it more useful and relevant to readers and less, "here's what I painted."
Saturday, June 19, 2010
Storm Wardens: Land Raider pt. 2

My contribution to the Storm Wardens Charity Project is well on its way. There's still time for you to contribute and get a chance to win the entire army. Check out the links on the right to see what the rest of the team - including some big names! - are up to.
As for the model... please forgive the shine - I put down a layer of clear gloss before applying the pigments and the model is very, very shiny. It's finally starting to come together though and I should have it finished early next week.
While I was working on this I remembered a quick tip for working with tank treads: if there's a track guard in place the FRONT tracks will be clean and shiny except in the deepest recesses. Save your heavy weathering for the back of the tank. The track guard will rub the track clean and what you'll be left with up front is a small amount of dirt and rust.
When I finish the rest of the basic detailing I'll come back and apply the pigment weathering to the sides and back of the tank. I'm using "Burning Sands" as the primary colour to help the model work with the pressure cast resin bases - "Flagstone" - that the entire army is standing on.
More to come as I have time.
Thursday, March 18, 2010
Weathering Workshop - Sacramento, CA
Friday 26-March @ 6:30 PM
Great Escape Games and Secret Weapon Miniatures are presenting a FREE model weathering workshop. Justin "misterjustin" McCoy, founder of Secret Weapon, will be in the shop to present a one hour introduction to working with weathering pigments that will include:
* Pigments vs. Pastels
* What to look for in a pigment
* Basic application - dry
* Using a thinner to set pigments
* Using a liquid fixative to set pigments
* Achieving realistic dust/dirt
* Achieving realistic rust
* Weathering tracks and tires
* Weathering metal and engines
* Weathering exhausts and gun muzzles
* Weathering infantry
Participants are invited to bring a model for demonstration purposes. This model should have all of the basic painting completed - although some demonstration can be done on a primed model.
For more information send an email to misterjustin at Secret Weapon Miniatures dot com or leave a comment with your contact information.
I will also have product samples on hand - and although I will have two models for the demonstration my hope is to use what attendees bring with them. Everyone should get a chance to try the materials and techniques and I will stick around for a bit after the workshop for some 1:1 assistance.
Friday, December 25, 2009
Vostroyan Army: Leman Russ A01

I have started re-painting the first tank in my old Armored Company. This allows me to recycle those tanks AND work on the techniques I'll be using on my Games Day 2010 entry... without having to improve them while painting my Forge World model.
Sorry about the shine but there's a layer of gloss on there.
I took some step-by-step photos but I've gone back and redone much of it so I'll get a new series when I settle on the process. This guy still has quite a ways to go AND WILL BE PART OF MY ARMY! This model WILL see game play.
Feedback is very welcome and I'm happy to answer any questions. Thanks in advance!
Photos of the original Armored Company can be seen in the "Armored Company" tag.
I may still sell a couple of those tanks since they don't really fit the Vostroyan army... but for now I'm glad to have finished tanks to start painting.
Sunday, November 22, 2009
Vostroyan Sniper - Snow Theme Competition
There are a lot of things about this guy I would change if I were going to start over - but given that I'm painting him in quick and dirty strokes I'm fairly pleased. I do need to get some better photos but I wanted to get something up for feedback while I had some free time.All of the basing was done with the Instant Scenery Kit - Winter from Secret Weapon Miniatures. I'm really pleased with how well the products work and how easy it was to get a detailed base finished in a hurry. I still haven't made a dent in the mock-up box even though I've done this base and covered one of my display bases in snow.
On to the next project for a bit... goodness knows I have enough of them!
Labels:
Competition,
Imperial Guard,
Secret Weapon,
Vostroyan,
weathering,
WIP
Saturday, November 14, 2009
Vostroyan Sniper - Snow Theme Competition Mini
This guy is getting into a winter theme competition but I decided to paint this guy army fashion - meaning quick and with little or no mixing - to see if I could develop a decent recipe for my army I'm a little over an hour into this guy and I'm pretty pleased.I'm not using a Secret Weapon base for this guy (GASP!) because I wanted to see what I could do using just the materials in the new Instant Scenery Kit: Winter -- so this is a stock GW base with materials from that kit.
I'd hoped to finish him in under two hours but I think I'll break that by just a bit while I play with getting the snow and weathering right. I can live with that.
Feedback is very welcome - and I'll try to get some better photos, of course.
Labels:
Competition,
Imperial Guard,
Secret Weapon,
Vostroyan,
weathering,
WIP
Tuesday, October 6, 2009
Winter Guard Command Squad
When I finished painting up the "Trench Works" squad display base for Secret Weapon I knew that I had to revisit my winter themed Imperial Guard. I went out and picked up a Cadian Command Squad and used it out of the box with the addition of Pig Iron heads.The bases and display stand will all get a healthy dose of brown grass and snow before this thing is finished. I also haven't settled on how I'm going to arrange folks on the base - although I'm reasonably happy with how I have them set out at the moment.
The only conversion is on the banner arm. Unfortunately the Cadian banner is in the right hand and the regimental banner is in the left. I really wanted to use the bandaged arm, in keeping with my intended theme, which meant I had to cut the banners off of the pole and shoulder they were attached to.
I'm trying to sneak in more time on this between the current commission and all of the Secret Weapon work I'm trying to get done -- so hopefully I'll have an update soon.
Monday, September 21, 2009
Video Tutorial: Salt Chip Weathering
With Secret Weapon Miniatures up and running I finally had a few minutes today to get the oft' requested tutorial on salt chip weathering put together.This is just a very quick look at salt chip weathering using Krylon aerosol sprays for the base coat and the top layer. I would normally do all of the painting with my airbrush so that I could shade and highlight while I was working, but just wanted to demonstrate the basics for this technique.
If you're trying this with an airbrush for the first time let me stress one important point: wait a LONG TIME for your paint to dry! If you try to rinse off the salt too early you can easily wash all of your hard work away in the process. If you have the patience let the model sit over night in a warm, dry environment - but at least give it a couple of hours.
Friday, July 10, 2009
Video Tutorial - Quick Weathering Part 4: Pastel/Pigment Powders
Here is the fourth and final installment in my first weathering video tutorial series. This is a quick look at weathering with pastel/pigment powders. I weathered this a bit more heavily than I would have normally done so that it would show up on my little camera but the basic techniques are the same.
Tamiya 2.5 Ton Truck - example from the video
Video 1: Artist Pencils
Video 2: Dot Oil Filter
Video 3: Oil Grime & Rust
Tamiya 2.5 Ton Truck - example from the video
Video 1: Artist Pencils
Video 2: Dot Oil Filter
Video 3: Oil Grime & Rust
Wednesday, July 8, 2009
Finished Arvus Lighter Commission
I painted this model for Niroe - usually found on the Boot Camp and WIP forums - using the oil methods over a Krylon grey primer base. I used a bit of Tamiya XF-62 "Olive Drab" on the cockpit and one panel on each wing.
The engines got a bit of powder weathering to get the blue heat effect. I drybrushed the exhaust Boltgun and then Bronze before adding another blue wash.
The decals were weathered with sandpaper -- remember, before you use sandpaper on a decal it's gloss, decal, gloss and then sandpaper. If you're going to do additional weathering, like the dot oil method I used, an additional matte coat is applied first.
And unless Niroe wants to see something changed this one is finished and it's time to move on. Next up... probably another tank.
Labels:
Commission,
Forge World,
Imperial Guard,
vehicle,
weathering
Tuesday, July 7, 2009
Video Tutorial - Quick Weathering Part 3: Rust & Grime
This is the second part of my oil weathering video - presented here as Part 3. In this video I take a quick look at applying rust and grime with oil paints.
Part 1 - Artist Pencils
Part 2 - Oil Dot Filter Method
Part 1 - Artist Pencils
Part 2 - Oil Dot Filter Method
Saturday, July 4, 2009
Imperial Guard: Winter Theme Chimera 02
I finally finished the winter theme Chimera I was working on... just in time to realize I forgot to weather the pack and the drum can on the back. Sigh. For now those oversights will get to live on as I've set the model aside already. It's time to work on something else.
I'm really pleased with how this one turned out. It was enough work that it's not something I'd do every day -- but not so much that I'm unwilling to do a Guard army to this standard. I'm still debating between my winter Guard and my traitor Guard though...
For now this is just a one-off Chimera. Enjoy.
Friday, July 3, 2009
Video Tutorial - Quick Weathering Part 2: Oil Filters
I've put together a series of video tutorials covering the basics of my three favorite weathering methods: pencils, oils and pastels. The image below shows the results of all three techniques applied over two different base coats.

The second video in the series demonstrates using small dots of water mixable oil paints to weather a vehicle. This is most commonly referred to as the dot filter method.
It cuts off at the end to stay under the ten minute maximum - and I'll post part two of this video shortly.
The second video in the series demonstrates using small dots of water mixable oil paints to weather a vehicle. This is most commonly referred to as the dot filter method.
It cuts off at the end to stay under the ten minute maximum - and I'll post part two of this video shortly.
Thursday, July 2, 2009
Video Tutorial - Quick Weathering Part 1: Pencils
I've put together a series of video tutorials covering the basics of my three favorite weathering methods: pencils, oils and pastels. The image below shows the results of all three techniques applied over two different base coats.

The first video in the series demonstrates using artist pencils to create scratches as a foundation for later weathering.
Thursday, June 25, 2009
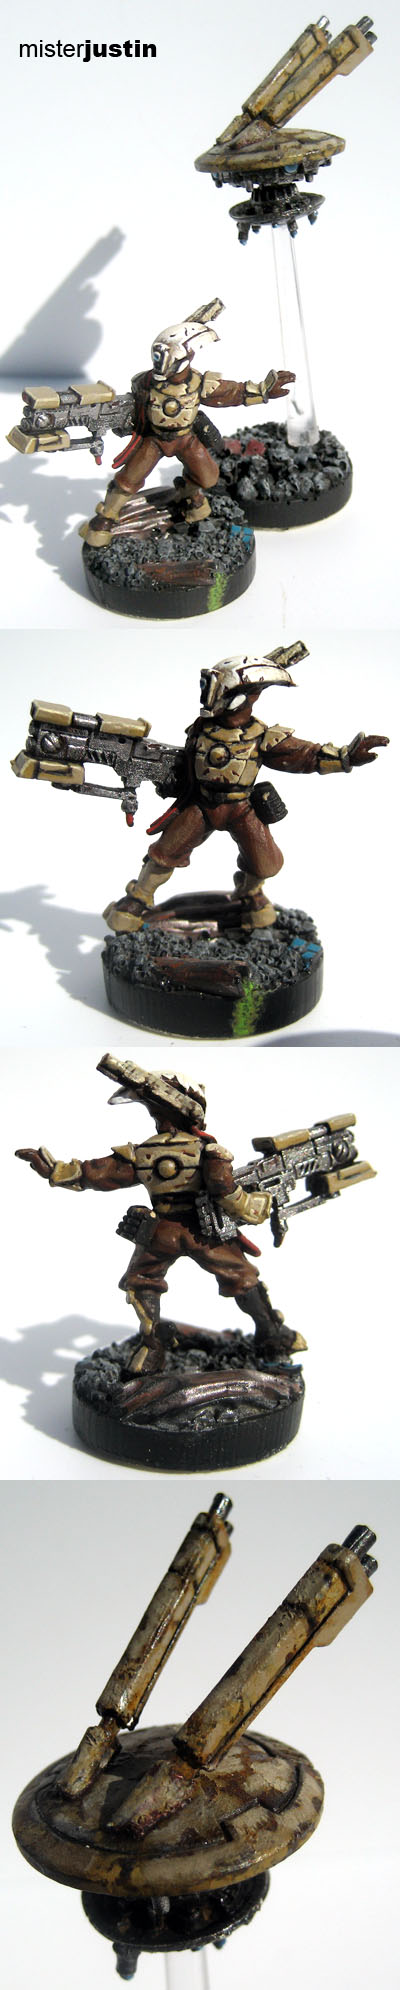
Tau: Pathfinder Shas'Ui
I got this guy as part of the miniature exchange on the Relic forums and am entering him into the exchange competition.
I decided to weather Shas'Ui only slightly but to really go to town on the shield drone. I figured the shield drone would be old, weathered and pretty damaged from soaking up shots. I didn't repair the gap in his power line only because I'm a lazy git. This was my first Tau and I really enjoyed painting him.
Monday, June 15, 2009
GM 2.5 ton 01
It's time for an update on the 2.5 ton truck:
Although not strictly accurate I'm going to paint the canvas over the cargo as an American flag.
The truck was painted using the oil filter and pigment weathering methods - the latter of which I've already posted a tutorial for. I hope to have the oil filter tutorial finished shortly.
There will also be a generous coating of mud in place before the model is finished -- complete with a mud tutorial.
Mmm, it must be tutorial season....
Friday, June 12, 2009
Weathering With Pastel Powders
While considering which weathering tutorials to write up and where I would start I realized I have a Tamiya 2.5 Ton Cargo Truck sitting on my desk. Although it's not a 40k I'm going to use most of the techniques in my arsenal to get it finished and realized this made it the perfect tutorial project.
First up is an introduction to weathering with pastel powders. I'm using "Doc O'Brien's" for this tutorial. I'm happy with the product, and you get a few colours it's harder to match with art store pastel sticks, but you can do this much less expensively with generic art pastels and some sandpaper.
This is the un-weathered cab. I have base coated the interior and painted the seats.

The colors I'm using are "Rust Red," "Rust Brown," "Grimy Black" and "Dirt Brown." I will use Testors enamel thinner sparingly as we go - and that bottle will likely last me several years.

I bought a $3 pack of crappy brushes to use with powders. I took one of them and cut it off about 10mm or 1/4" from the ferrule. Using this brush I applied "Rust Red" in a generous layer. You can blow off, brush off or wipe off excess - like I do in the next step.
Using another cheap brush I applied some enamel thinner and wiped away a bit of the "Rust Red" powder. This also helps get the remaining powder into the recesses and will bind it more permanently to the model. In the image on the right I have added the "Rust Brown" powder.

Application of more thinner (left) and "Dirt Brown" (right).

Application of "Grimy Black" gives us the finished image for the deck plate. In the bottom image you can see where I stippled the rust near where feet would kick getting into the truck. Always remember that corners will be more heavily weathered in most vehicles. I applied additional black, and then thinned heavily, where the driver's feet would rub.

These techniques and materials can be used to create incredibly realistic rust, dirt and grime and are very well suited to vehicles. Use them on engines, treads, bolts, hatches... anywhere you'd expect to find gunk and rust.
Next up... playing with oil!
First up is an introduction to weathering with pastel powders. I'm using "Doc O'Brien's" for this tutorial. I'm happy with the product, and you get a few colours it's harder to match with art store pastel sticks, but you can do this much less expensively with generic art pastels and some sandpaper.
This is the un-weathered cab. I have base coated the interior and painted the seats.
The colors I'm using are "Rust Red," "Rust Brown," "Grimy Black" and "Dirt Brown." I will use Testors enamel thinner sparingly as we go - and that bottle will likely last me several years.
I bought a $3 pack of crappy brushes to use with powders. I took one of them and cut it off about 10mm or 1/4" from the ferrule. Using this brush I applied "Rust Red" in a generous layer. You can blow off, brush off or wipe off excess - like I do in the next step.
Using another cheap brush I applied some enamel thinner and wiped away a bit of the "Rust Red" powder. This also helps get the remaining powder into the recesses and will bind it more permanently to the model. In the image on the right I have added the "Rust Brown" powder.
Application of more thinner (left) and "Dirt Brown" (right).
Application of "Grimy Black" gives us the finished image for the deck plate. In the bottom image you can see where I stippled the rust near where feet would kick getting into the truck. Always remember that corners will be more heavily weathered in most vehicles. I applied additional black, and then thinned heavily, where the driver's feet would rub.
These techniques and materials can be used to create incredibly realistic rust, dirt and grime and are very well suited to vehicles. Use them on engines, treads, bolts, hatches... anywhere you'd expect to find gunk and rust.
Next up... playing with oil!
Wednesday, May 27, 2009
WinterGuard-Chimera01
I've been working on the weathering techniques and colours for my winter themed Imperial Guard army. Not that I'm going to get to it any time soon -- but it was a good excuse to practice vehicle weathering and snow application.
The snow is PVA, water and baking soda. The mud was applied using water, pastel pigments and PVA; I also dipped the brush in static grass every now and then for additional effect.
Additional stowage is from Venderlein -- although I'll apply it differently on future vehicles and not add any cloth to the hull. It's snowing, raining and horrible -- not so much "put your backpack on the tank" weather.
Tuesday, March 24, 2009
Winter Guard 02
While there are a few changes I'll make when the models go into army mode -- I'm fairly set on the scheme for my Imperial Guard army now.
I was inspired by the Russian coats and German uniforms of World War Two and found paint recipes online for both. The helmet and armor were done with two layers of white wash -- and I'll do one layer on future models.
The head is from Pig Iron but I'm going to try another test model on a standard Cadian head to see how I feel about it. I'd much rather use straight GW products, so it's a competition legal army, but I'm not terribly inspired by the available heads.
The snow was made with baking soda and PVA glue. Nothing exciting there. It's still my favorite snow recipe. A bit thick on this one, perhaps, but that too can change for future models.
Subscribe to:
Posts (Atom)