Pages

Showing posts with label Imperial Guard. Show all posts

Friday, October 22, 2010

584th Krieg Update: Chimera, Hellhound & Infantry


The Artemia pattern Hellhound is starting to come together. I applied and sanded the decals then did the first round of weathering. I might add more chipping, otherwise pigments are next.


This is the finished Chimera conversion. I'm not entirely sold on the Predator turret but think I'll get it painted before I decide. Unless someone points out a detail I missed I'll move on to modeling battle damage next.


These are the first three infantry test models. They're not finished but I figured they were ready for some feedback.

Next up - back to the mortar team, I think.

Wednesday, October 13, 2010

Krieg Mortar Team

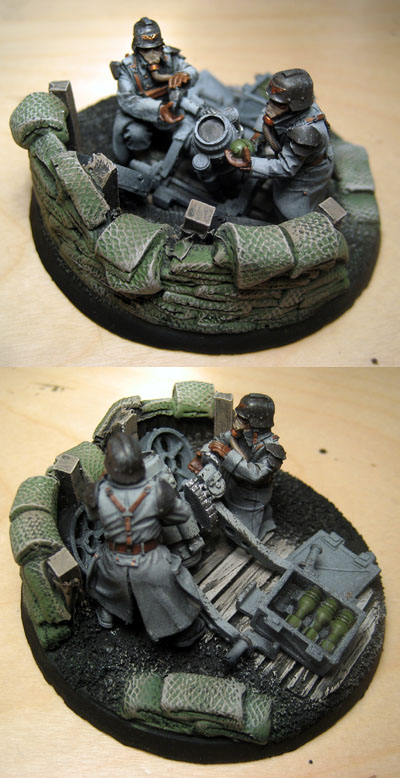
The base will be finished with pigments and all of the models and bits need to be weathered to match - but I have to stop for the day and thought I'd throw up some pics.

Should I add "wet" snow to the finished base?

I'm a big fan of modeling snow. I'd like to put my Krieg in snow but I'm wondering if folks out there think it will take away from the models.

I'd make it very wet looking snow to blend in with the mud, of course, but...

Thanks in advance for any feedback.

Tuesday, October 12, 2010

Artemia Pattern Hellhound

I've always wanted to paint one of the Artmia Pattern Hellhound models from Forge World. When I added a Hellhound to my army list this month I finally had the excuse I was looking for. Of course my list calls for a pintle stubber... and I forgot that this model can't take one. Oops.

Anyway, on with the show:


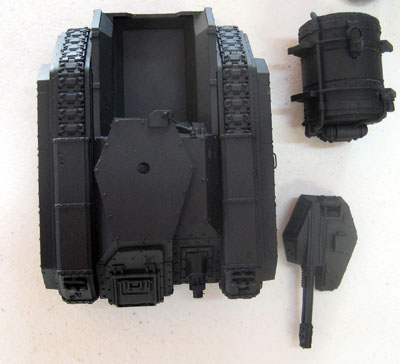
The model was washed and then primed with Krylon white primer. After that dried I painted the model black using Games Workshop "Chaos Black" and an airbrush.


The fuel tank was airbrushed GW "Dark Flesh" and then splatter sprayed with "Desert Yellow." This will form the basis for the rust later.


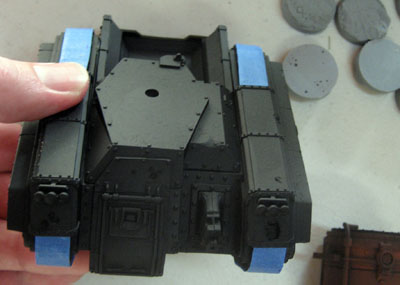
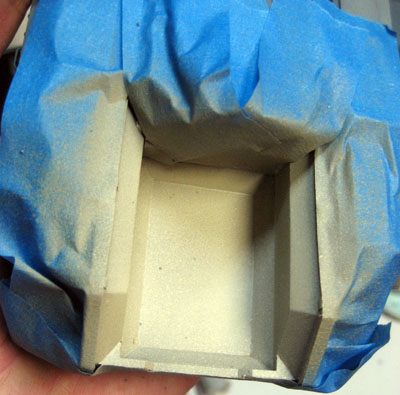
The tracks were taped to avoid painting them grey. In this pic you can also see a set of "Runic Mountain" bases that got rejected -- I won't ship a base with that many bubbles on the bottom :)


The model was base coated GW "Codex Grey" and then painted "Fortress Grey" from the top and 45* on each side. Lastly a spot of "Elf Flesh" was added to the "Fortress Grey" paint to create panel highlighting on the top.


The fuel bay was based GW "Desert Yellow" and then a mix of "Commando Khaki" and "Bleached Bone." I did this to help the fuel bay, which is largely hidden by the fuel tank, stand out a bit and add some additional visual interest.


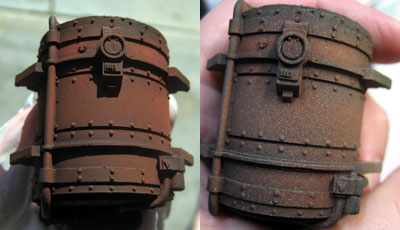
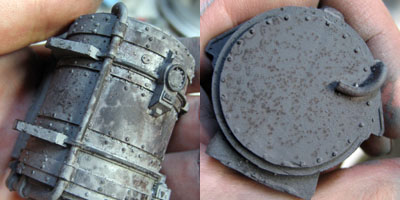
Using hairspray and salt to mask the rust colours I painted the fuel tank in the same greys as the body of the vehicle. I weathered the top of the fuel tank, where it would be banged during refilling, very heavily. The right photo shows the section closest to the body of the vehicle where it would corrode but receive very little additional damage.


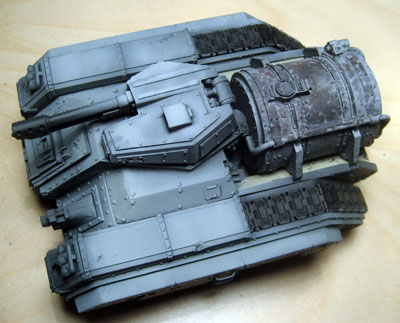
The base coated model with fuel tank in place.


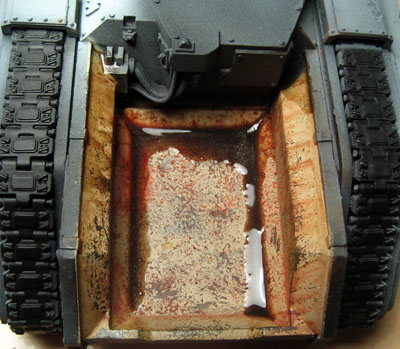
The fuel bay was weathered with sponge applied chipping, oils and pigments. As a final step I mixed up some "oil" and ran it into the bay from the top corners to simulate runoff from refilling the fuel tank. It is, of course, almost entirely hidden once the fuel tank is in place... but it was fun to do anyway.

Unfortunately I forgot to order my Krieg transfer sheet so this is where I'm going to have to stop the model for awhile. Before I move on to anything else I need to get the decals in place. Oops.

My total painting time at this stage is a little more than 2 hours, possibly creeping up on 3.

Feedback is ALWAYS welcome and questions will be answered.

Sunday, March 28, 2010

Imperial Guard Kill Team


I've been working on armies off and on for a few years now - and I still don't have one I can game with regularly. To help correct that, and give me a chance to learn the rules, I've put together two kill team lists. One uses 25 of my Vostroyan infantry and the other, shown here, is an 11 man hitter:

Vet squad w/ Harker (2 flamers)
Marbo

I don't have Marbo in the picture because I haven't started painting him and I'm shy one flamer so the other vet is standing by.

Because I might eventually use these models with my Vostroyans they're being done in the same colours but with Cadian bodies and Pig Iron heads to help differentiate them.

Wednesday, March 24, 2010

Forge World Executioner - Color Test 01


This isn't the Executioner. This is one of several Leman Russ that I have laying about. I decided to pull a couple of them out of my army transport bag and start doing some color tests.

On this first I like the recipe but think I applied the second highlight much too heavily. Much, much too heavily. I'm going to set this one aside for my weathering workshop on Friday and get another one ready to spray later this week.

I won't let paint touch the Executioner until I'm happy with a color test though. Nope, no sir. Not gonna happen.

Saturday, March 13, 2010

Forge World Executioner - Clean-up Time


I just couldn't stop myself from doing a bit more work on this today. I still need to finish the restraints on the pioneer kit and do a bit of clean-up but otherwise, barring any feedback from the online community, I think it's time to set the model aside and move on to the base.

A friend is sending me some of the FW Krieg decals to help with the finishing touches and I'm going to test the paint scheme on... something prior to putting this thing in the same room as my airbrush. I'm sure I can dig up a tank from one of my boxes.

And now... back to my Vostroyans!

Forge World Executioner - Detailing Nearly Finished!!!


The starboard side brass rail for the skirt needs to be smoothed but at least it's cut, folded and attached.

I've added tracks on hooks to the front as both stowage and extra armor. I will add weld lines to the hooks, do a bit more folding and then fill in the mold marks on the tracks.

The brass pannier has been reattached and squared a bit more. It will have jerry cans in it when the model is finished.

I still need to decide where to put a couple of lights... but that doesn't have to happen today.

Wednesday, March 10, 2010

Forge World Executioner


I had a couple of people ask me what the brass triangles on the side of the tank were for so I thought I'd post an early WIP shot of the side skirt armor. I say "early" because this is only about 50% completed... on one side.

I need to bring the back of the support rail up a bit to correct the lay of the bottom line. There will also be secondary supports where the holes in the center of each panel are... assuming I remembered to line them up correctly.

The side skirts are going to get covered in litany text from bow to stern and then appropriately weathered and chipped. I won't be attaching them permanently so that I can get to the tank itself.

Tuesday, March 9, 2010

Forge World Executioner


My brass panniers came in today and I wasted no time in getting one onto the Executioner!

Of course I also apparently wasted no time in making sure that the edges were square. I'll fix that.

The detail on the engine is from the panniers frame. The bits on the side are cut brass that will form the top half of the side skirt armor rail.

The panniers are, of course, a Secret Weapon product -- and you get EIGHT panniers in three sizes on the frame. Oh yes, I will have a use for these....

Monday, March 1, 2010

Forge World Executioner


I spent the weekend detailing this bad boy with the intention of finally entering something into the Games Day competition. Assuming I can justify the air fare expense I plan to make it out this year and take this, and possibly my Empire Steam Tank, with me.

I am processing a set of etched brass panniers that will go on the turret. Once those are on I'll look at adding a whip antenna. I'm also finishing the design of a set of etched brass side skirt armor I plan to add.

The model will be painted in the Krieg greys and then whitewashed for winter camo. I will add wall-to-wall litany text to the side skirt armor.

I plan to make a base of broken cobblestones and urban rubble and will, of course, give the whole thing in a generous coating of snow and mud. Lots of mud.

Monday, February 15, 2010

Vostroyan Army: ROUGH RIDERS!


The incredible conversion work was done by John at Santa Cruz Warhammer -- and they have been a real pleasure to paint so far!

Yup, my army is getting Rough Riders. Ten of them at the moment. These five are unbased as I'm working on a set of new bike bases for Secret Weapon Miniatures. The urban series should work quite nicely for these guys - although I may put them on "Runic Mountain" bike bases... we'll see.

The Sergeant will keep the red coat to match the command squad and the rest of the unit will have cream coats to match the infantry. The Sergeant is also on an WFB Empire Outrider horse which turns out to be slightly larger than the stock Rough Rider horse.

I love these models and really couldn't be happier with the conversion work that John did for me. He put in a lot of extra little touches - such as the lens on the Sgt. - that have really kicked these up from Rough Riders to VOSTROYAN ROUGH RIDERS WOO HOOOOOOOOOOO!

Saturday, February 13, 2010

Vostroyan Army: First Infantry Squad


I'm nearly finished with the first infantry squad and decided it was time for an update. I've included a close-up shot of the five finished troops and a super zoom of the WIP Sergeant.

Things have been super crazy and I haven't gotten to do as much painting as I would like. I lost my job three weeks ago and have been looking for a new one - and trying to build Secret Weapon - ever since. I'll get some painting done though because I really want to see this squad finished.

I decided to use a red stripe on the left shoulder armor to identify this as the first infantry squad. I'll use similar marks on the other squads so I can tell them apart on the table.

The bases are from my "Urban Streets" line - although these are from the now defunct mold. I'll put the next squad on a set of the new version.

Sunday, January 24, 2010

Vostroyan Army: First Finished Infantry


I still have 43 infantry models to complete for my 1k army... but it's nice to have one finished.

The rest of the infantry will look more-or-less like this fella. I'm fairly happy with the end result and like how the snow works with my "Urban Streets" bases.

Tuesday, January 19, 2010

Vostroyan Army: Infantry Squad 01


I've made a solid start on the first five of my infantry. I still have a long way to go, of course, but given that this is the first time I've seen the colours on anything other than a single test model I'm reasonably pleased.

The melta conversion was made by snipping the end off of a Vostroyan flamer. The flamers will be made using the grenade launcher models - but that will happen later.

There are forty infantry - not counting the Command Squad - which includes four flamers and four meltas. I'd like to have the whole thing completed by the end of March. Between the day job, casting and sculpting that might actually be pushing my timeline a bit tight... but that's the goal all the same.

Friday, December 25, 2009

Vostroyan Army: Leman Russ A01


I have started re-painting the first tank in my old Armored Company. This allows me to recycle those tanks AND work on the techniques I'll be using on my Games Day 2010 entry... without having to improve them while painting my Forge World model.

Sorry about the shine but there's a layer of gloss on there.

I took some step-by-step photos but I've gone back and redone much of it so I'll get a new series when I settle on the process. This guy still has quite a ways to go AND WILL BE PART OF MY ARMY! This model WILL see game play.

Feedback is very welcome and I'm happy to answer any questions. Thanks in advance!

Photos of the original Armored Company can be seen in the "Armored Company" tag.

I may still sell a couple of those tanks since they don't really fit the Vostroyan army... but for now I'm glad to have finished tanks to start painting.

Sunday, November 22, 2009

Vostroyan Sniper - Snow Theme Competition

There are a lot of things about this guy I would change if I were going to start over - but given that I'm painting him in quick and dirty strokes I'm fairly pleased. I do need to get some better photos but I wanted to get something up for feedback while I had some free time.

All of the basing was done with the Instant Scenery Kit - Winter from Secret Weapon Miniatures. I'm really pleased with how well the products work and how easy it was to get a detailed base finished in a hurry. I still haven't made a dent in the mock-up box even though I've done this base and covered one of my display bases in snow.

On to the next project for a bit... goodness knows I have enough of them!

Saturday, November 14, 2009

Vostroyan Sniper - Snow Theme Competition Mini

This guy is getting into a winter theme competition but I decided to paint this guy army fashion - meaning quick and with little or no mixing - to see if I could develop a decent recipe for my army I'm a little over an hour into this guy and I'm pretty pleased.

I'm not using a Secret Weapon base for this guy (GASP!) because I wanted to see what I could do using just the materials in the new Instant Scenery Kit: Winter -- so this is a stock GW base with materials from that kit.

I'd hoped to finish him in under two hours but I think I'll break that by just a bit while I play with getting the snow and weathering right. I can live with that.

Feedback is very welcome - and I'll try to get some better photos, of course.

Tuesday, October 6, 2009

Winter Guard Command Squad

When I finished painting up the "Trench Works" squad display base for Secret Weapon I knew that I had to revisit my winter themed Imperial Guard. I went out and picked up a Cadian Command Squad and used it out of the box with the addition of Pig Iron heads.

The bases and display stand will all get a healthy dose of brown grass and snow before this thing is finished. I also haven't settled on how I'm going to arrange folks on the base - although I'm reasonably happy with how I have them set out at the moment.

The only conversion is on the banner arm. Unfortunately the Cadian banner is in the right hand and the regimental banner is in the left. I really wanted to use the bandaged arm, in keeping with my intended theme, which meant I had to cut the banners off of the pole and shoulder they were attached to.

I'm trying to sneak in more time on this between the current commission and all of the Secret Weapon work I'm trying to get done -- so hopefully I'll have an update soon.

Saturday, September 26, 2009

Commissioned Forge World Vulture - FINISHED!

Barring any changes, corrections or additional weathering requests from the client this bad boy is finally finished.

I'm very pleased with the overall result and will be re-using this yellow recipe on future projects. The shading really pops and allows for some decent weathering effects.

The cockpit is fully detailed although painted to a lower standard than the rest since it won't be visible through the black frosted glazing.

There are a couple of little things I might have done differently if this were my model. Namely more decoration on the wings - stripes or aquila wings most likely - and perhaps some checkers somewhere. I don't know why but this thing really screams out for some black/white checkers to me. Red/white checkers might work too.

Maybe I'll use this as inspiration for an Imperial Fist vehicle or a Bad Moons stompa...

Wednesday, September 2, 2009

Commissioned Forge World Vulture 01

I got back from a two week holiday on Monday and started work on a new commission.

The yellow recipe was painted with an airbrush using:

GW "Golden Yellow" (GY)
GY + VMC "Light Yellow" (LY) 2:1
GY + LY 1:1
LY

This was shaded with a glaze of GW "Dark Flesh" generously thinned and likewise applied with the airbrush. Preshading was done with a mix of black and GW "Dark Green" with just a tiny touch of the latter.

Photos were taken in natural, diffused light. Lack of shadows in the backgrounds gives an idea of how the shading/highlighting actually turned out. The last two images do a good job of showing the more subtle transitions.

Decals and the engine are next - weathering will come later.