This is the second part of my oil weathering video - presented here as Part 3. In this video I take a quick look at applying rust and grime with oil paints.
Part 1 - Artist Pencils
Part 2 - Oil Dot Filter Method
Tuesday, July 7, 2009
Saturday, July 4, 2009
Imperial Guard: Winter Theme Chimera 02
I finally finished the winter theme Chimera I was working on... just in time to realize I forgot to weather the pack and the drum can on the back. Sigh. For now those oversights will get to live on as I've set the model aside already. It's time to work on something else.
I'm really pleased with how this one turned out. It was enough work that it's not something I'd do every day -- but not so much that I'm unwilling to do a Guard army to this standard. I'm still debating between my winter Guard and my traitor Guard though...
For now this is just a one-off Chimera. Enjoy.

I'm really pleased with how this one turned out. It was enough work that it's not something I'd do every day -- but not so much that I'm unwilling to do a Guard army to this standard. I'm still debating between my winter Guard and my traitor Guard though...
For now this is just a one-off Chimera. Enjoy.

Friday, July 3, 2009
Video Tutorial - Quick Weathering Part 2: Oil Filters
I've put together a series of video tutorials covering the basics of my three favorite weathering methods: pencils, oils and pastels. The image below shows the results of all three techniques applied over two different base coats.

The second video in the series demonstrates using small dots of water mixable oil paints to weather a vehicle. This is most commonly referred to as the dot filter method.
It cuts off at the end to stay under the ten minute maximum - and I'll post part two of this video shortly.
The second video in the series demonstrates using small dots of water mixable oil paints to weather a vehicle. This is most commonly referred to as the dot filter method.
It cuts off at the end to stay under the ten minute maximum - and I'll post part two of this video shortly.
Thursday, July 2, 2009
Video Tutorial - Quick Weathering Part 1: Pencils
I've put together a series of video tutorials covering the basics of my three favorite weathering methods: pencils, oils and pastels. The image below shows the results of all three techniques applied over two different base coats.
The first video in the series demonstrates using artist pencils to create scratches as a foundation for later weathering.
The first video in the series demonstrates using artist pencils to create scratches as a foundation for later weathering.
Tuesday, June 30, 2009
About my commission work....
I am currently accepting commission work. I quote a firm MAXIMUM cost prior to starting work. If I go over there is no charge for the extra time - if I'm under my estimate you keep the difference.
All of the models I paint are individually painted and detailed - I will never "dip" or mass drybrush your models. My goal is to give you something I'd be happy to have on my own table every time. Even "lower tier" models get layered highlights and detailing.
Check out the "Testemonials" label to see what folks have said about working with me -- and the pieces below are fair representations of what I do on commission these days.
If you have a project you'd like to discuss please email misterjustin at gmail with the information. I'll get back to you as quickly as I can and, if you like, get a current or former client in touch with you so you can talk to them about their experience.
All of the models I paint are individually painted and detailed - I will never "dip" or mass drybrush your models. My goal is to give you something I'd be happy to have on my own table every time. Even "lower tier" models get layered highlights and detailing.
Check out the "Testemonials" label to see what folks have said about working with me -- and the pieces below are fair representations of what I do on commission these days.
If you have a project you'd like to discuss please email misterjustin at gmail with the information. I'll get back to you as quickly as I can and, if you like, get a current or former client in touch with you so you can talk to them about their experience.
 |  |
 |  |
 | |
Thursday, June 25, 2009
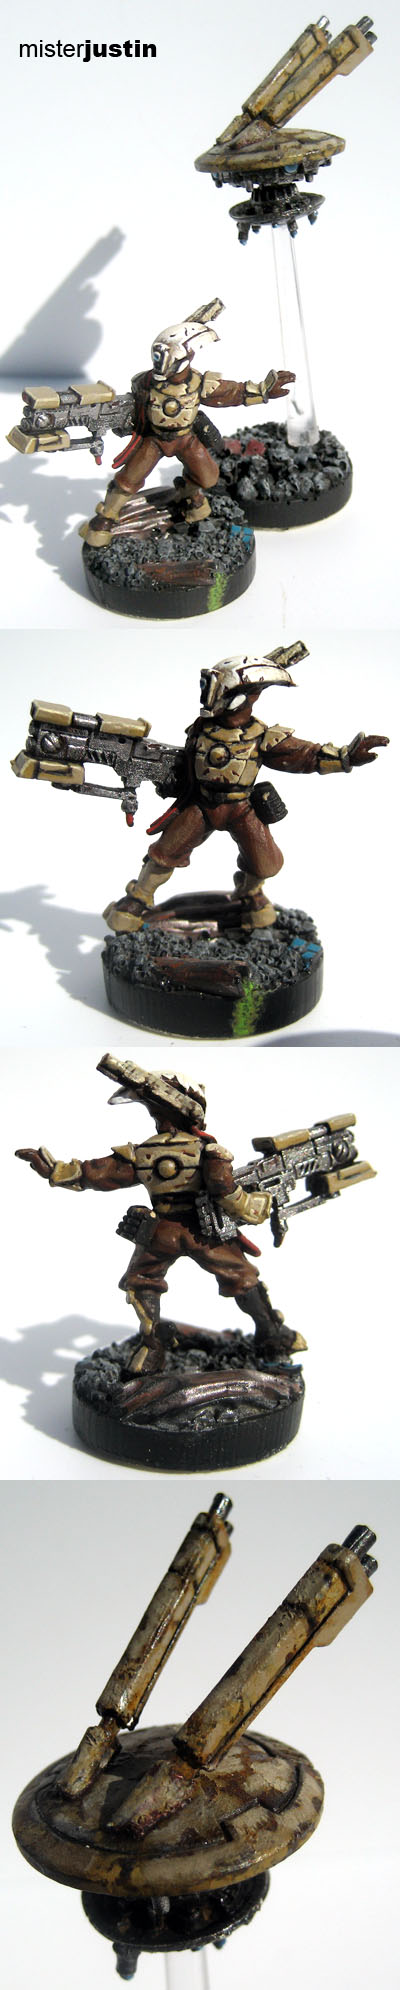
Tau: Pathfinder Shas'Ui
I got this guy as part of the miniature exchange on the Relic forums and am entering him into the exchange competition.
I decided to weather Shas'Ui only slightly but to really go to town on the shield drone. I figured the shield drone would be old, weathered and pretty damaged from soaking up shots. I didn't repair the gap in his power line only because I'm a lazy git. This was my first Tau and I really enjoyed painting him.

I decided to weather Shas'Ui only slightly but to really go to town on the shield drone. I figured the shield drone would be old, weathered and pretty damaged from soaking up shots. I didn't repair the gap in his power line only because I'm a lazy git. This was my first Tau and I really enjoyed painting him.
Tuesday, June 23, 2009
Hello Toycutter
This is just a quick hello to anyone coming to the site for the first time via TOYCUTTER. Thanks for the write-up of my commissar!
http://www.toycutter.com
http://www.misterjustin.com/2009/05/commissar-01.html
http://www.toycutter.com
http://www.misterjustin.com/2009/05/commissar-01.html
Monday, June 22, 2009
Quick Tip: Brush Tub

The photo is a three cavity painting tub. I picked this one up at Michael's Arts & Crafts in the USA for $1.99 -- although I wasn't able to find one on their website. It is, without exception, the only thing other than paints, brushes and models that I think every hobby painter MUST OWN.
This will extend the life of your brushes dramatically. Add a bit of brush cleaning soap - some people use regular dish soap - in the big chamber and it's even better. If I had to give up all of my fancy gadgets and tools but for one this is what I'd keep.
Friday, June 19, 2009
Quick Tip: Gloss vs. Flat Sealer
A gloss sealer will give the model a smooth, glass like finish; a flat or matte sealer has a rougher texture. But Gloss and flat sealers do more than change the finish on a model.
For instance, decals are easier to apply, and will last longer, on a gloss surface.
Here's a quick breakdown of which surface is better for various techniques:
Knowing which sealer to apply for which technique will help you decide in which order to apply weathering techniques.
For instance you should always apply a gloss layer before and after applying decals. However putting gloss over pigments/pastels will likely make most of your effort disappear.
For instance, decals are easier to apply, and will last longer, on a gloss surface.
Here's a quick breakdown of which surface is better for various techniques:
| Gloss | Flat/Matte |
|---|---|
| Overall washes | Oil filters |
| Decals | Panel line washes |
| Protect acrylics | Drybrushing |
| Oil filter (dot method) | |
| Pastels/Pigments |
Knowing which sealer to apply for which technique will help you decide in which order to apply weathering techniques.
For instance you should always apply a gloss layer before and after applying decals. However putting gloss over pigments/pastels will likely make most of your effort disappear.
Monday, June 15, 2009
GM 2.5 ton 01
It's time for an update on the 2.5 ton truck:
Although not strictly accurate I'm going to paint the canvas over the cargo as an American flag.
The truck was painted using the oil filter and pigment weathering methods - the latter of which I've already posted a tutorial for. I hope to have the oil filter tutorial finished shortly.
There will also be a generous coating of mud in place before the model is finished -- complete with a mud tutorial.
Mmm, it must be tutorial season....

Although not strictly accurate I'm going to paint the canvas over the cargo as an American flag.
The truck was painted using the oil filter and pigment weathering methods - the latter of which I've already posted a tutorial for. I hope to have the oil filter tutorial finished shortly.
There will also be a generous coating of mud in place before the model is finished -- complete with a mud tutorial.
Mmm, it must be tutorial season....
Subscribe to:
Posts (Atom)