Pages

Friday, October 22, 2010

584th Krieg Update: Chimera, Hellhound & Infantry


The Artemia pattern Hellhound is starting to come together. I applied and sanded the decals then did the first round of weathering. I might add more chipping, otherwise pigments are next.


This is the finished Chimera conversion. I'm not entirely sold on the Predator turret but think I'll get it painted before I decide. Unless someone points out a detail I missed I'll move on to modeling battle damage next.


These are the first three infantry test models. They're not finished but I figured they were ready for some feedback.

Next up - back to the mortar team, I think.

Sunday, October 17, 2010

584th Krieg Mechanized Interdicion Regiment


I did a lot of commission work for Niroe (he posts on the Boot Camp forum) on his Krieg army. At one point he had a set of custom icons sculpted and I still have a bunch. When I started doing my Krieg models, and needed to repair the track guard on my Artemia Hellhound, I had an idea...

And so now I'm adding to the 584th Krieg Mechanized Interdiction Regiment!

All of my vehicles will now sport the icons and I'll carry on with his fluff.

This is the first of my set-back turret Chimera conversions. I'll probably be using the Predator turret on these and I'm waiting for one to come from Battlefront Games.

This will join ranks with my Artemia Hellhound, which is where the painted icon came from at the top of the Chimera pic, and my mortar team of course.

More to come....

Thursday, October 14, 2010

Ask misterjustin: Painting Realistic Rock

My "realistic rock" tutorial has been a long running favorite and I've redone it a couple of times now. I figured it was finally time to get it posted in video format though and so here it is!


The technique is a bit rushed in the video as I only have 9 minutes before YouTube cuts me off. But if you want to see additional examples of the finished technique just check out the "Runic Mountain" pressure cast resin bases. I painted the whole lot of them using this technique to create differin styles.

Ask misterjustin: Priming Models

After I posted pics of one of my personal projects I had several people ask me why I would prime a model white and then paint it black. It's an excellent question and I'm happy to answer it.

First let me say that you should only apply a very (VERY!) thin layer of primer to your models. I'll look at why below but when I say "thin" I mean that if you're priming white over a grey model you should still be able to see grey through the primer.

If you apply the primer too thickly you'll loose detail on the model and create a smooth layer that will be LESS effective at helping paint to adhere to the model (see 1, below).

Now let's look at why you prime a model:


  1. It adds "teeth" to help paint adhere to the mode
  2. It helps in finding mold lines and surface defects
  3. It allows you to use thinner layers of paint
  4. Pre-shading


1. By using a thin layer of primer you create a very slightly rough texture on the model. This isn't the rough texture, often called "orange peel," that you get with a bad primer application but a very thin coating of paint. This thin coating creates tiny, microscopic peaks and valleys that will give the next layer of paint somewhere to rest. This keeps it from flowing more freely across the model and helps stop it from being rubbed off as easily with handling as there is more surface holding the paint in place.

2. Many are the mold lines you'll find when you add a thin layer of primer. This gives you a chance to clean them up, and re-prime just that section, before moving on.

3. By adding "teeth" to the model you can use thinner layers of paint, and thus loose less detail while painting, because it's easier for the second and subsequent layers to adhere to the model.

4. Pre-shading is something I'll cover in a future tutorial as it really is a topic of its own. But if you have a question about it please let me know in the comments or via email.

There are other reasons to prime a model but I won't cover those here. If you have a question I'll be happy to answer it in the comments, via email or with another tutorial though.

In the interim here's a look at how I primed one of the Beveled Edge "Trench Works" 60mm 02 bases.


And that's really it. Tight controlled burst of primer to create a thin layer of "teeth" for the next layers of paint to adhere to.

It's worth noting that the 60mm base in the video is going to be used with one of my models and will eventually be shades of black and brown.

Remember, if you have a weathering or detailing question you'd like answered just drop an email to misterjustin at secret weapon miniatures dot com.

Wednesday, October 13, 2010

Krieg Mortar Team

The base will be finished with pigments and all of the models and bits need to be weathered to match - but I have to stop for the day and thought I'd throw up some pics.

Should I add "wet" snow to the finished base?

I'm a big fan of modeling snow. I'd like to put my Krieg in snow but I'm wondering if folks out there think it will take away from the models.

I'd make it very wet looking snow to blend in with the mud, of course, but...

Thanks in advance for any feedback.

Tuesday, October 12, 2010

Artemia Pattern Hellhound

I've always wanted to paint one of the Artmia Pattern Hellhound models from Forge World. When I added a Hellhound to my army list this month I finally had the excuse I was looking for. Of course my list calls for a pintle stubber... and I forgot that this model can't take one. Oops.

Anyway, on with the show:


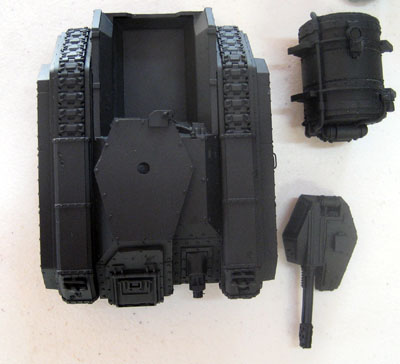
The model was washed and then primed with Krylon white primer. After that dried I painted the model black using Games Workshop "Chaos Black" and an airbrush.


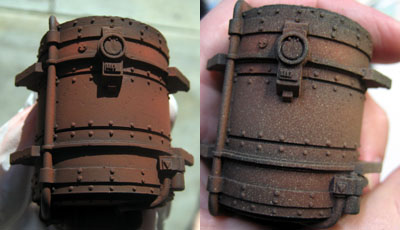
The fuel tank was airbrushed GW "Dark Flesh" and then splatter sprayed with "Desert Yellow." This will form the basis for the rust later.


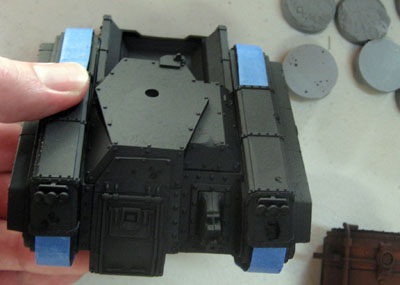
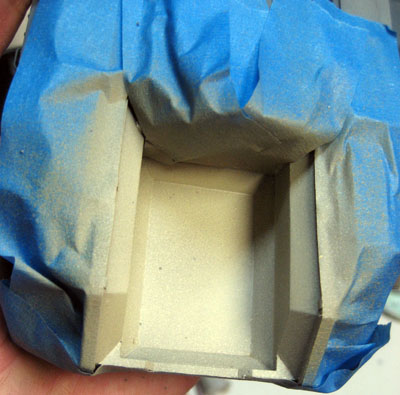
The tracks were taped to avoid painting them grey. In this pic you can also see a set of "Runic Mountain" bases that got rejected -- I won't ship a base with that many bubbles on the bottom :)


The model was base coated GW "Codex Grey" and then painted "Fortress Grey" from the top and 45* on each side. Lastly a spot of "Elf Flesh" was added to the "Fortress Grey" paint to create panel highlighting on the top.


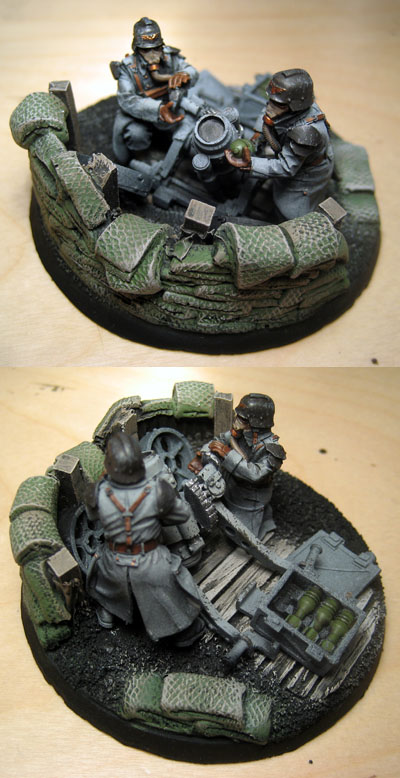
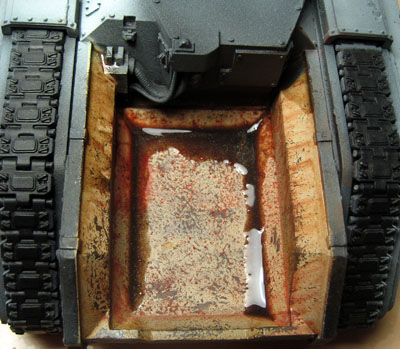
The fuel bay was based GW "Desert Yellow" and then a mix of "Commando Khaki" and "Bleached Bone." I did this to help the fuel bay, which is largely hidden by the fuel tank, stand out a bit and add some additional visual interest.


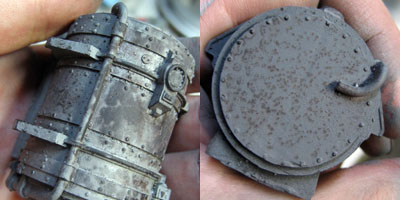
Using hairspray and salt to mask the rust colours I painted the fuel tank in the same greys as the body of the vehicle. I weathered the top of the fuel tank, where it would be banged during refilling, very heavily. The right photo shows the section closest to the body of the vehicle where it would corrode but receive very little additional damage.


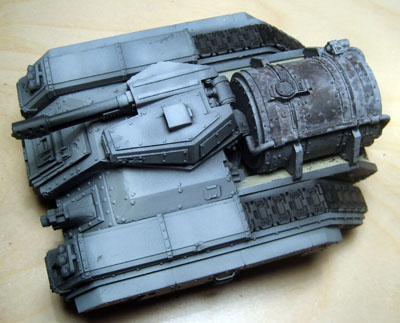
The base coated model with fuel tank in place.


The fuel bay was weathered with sponge applied chipping, oils and pigments. As a final step I mixed up some "oil" and ran it into the bay from the top corners to simulate runoff from refilling the fuel tank. It is, of course, almost entirely hidden once the fuel tank is in place... but it was fun to do anyway.

Unfortunately I forgot to order my Krieg transfer sheet so this is where I'm going to have to stop the model for awhile. Before I move on to anything else I need to get the decals in place. Oops.

My total painting time at this stage is a little more than 2 hours, possibly creeping up on 3.

Feedback is ALWAYS welcome and questions will be answered.