Pages

Thursday, July 30, 2009

August Painting Special - 20% Off Empire Wizards!

I'm launching my first commission discount special for the month of August, 2009.

Any Warhammer Fantasy Battles Empire Wizard at 20% off the total cost!

This includes conversion and painting work on any WFB Empire Wizard!

I'm running this special for the entire month of August on a first come, first served basis.

If this special is a success I will likely launch other discounts in the future - so jump in and get your Empire Wizard at 20% off while you can!

Wednesday, July 29, 2009

Commissioned Krieg Army - Command Vanquisher

I haven't posted a lot of photos of the Krieg army - at least not WIP shots - so I decided to post the start of this Command Vanquisher.

The model was put together by the client - Niroe if you're on Boot Camp or WIP - and the conversion work is his. I did a little bit of quick work on the seams for the double track guards but it's still a bit visible.

All three colors on the tank came out of Krylon spray cans - the camo colours tan, green and brown. From here I'll add a filter wash to blend things a bit and then drybrush. The work on this one should be reasonably quick.


More Krieg under the label...

Wednesday, July 22, 2009

Dark Angels Champion - Take 5

The last post was "Dark Angels Champion 02" and I'm jumping right in with number five.

Well, except for the first frame the photo quality is rubbish - but I re-painted the arm and shield on this guy and I am MUCH happier with the results.

I have NOT done the shading....

So the arm isn't finished. I think the eyes are though. I managed a very small Blazing Orange highlight in the bottom corners. Pleased doesn't begin to cover it.

Next up are the midtone touch-ups and the shading.


It didn't get a post of its own - but the "before" version of this arm is in my flickr stream.

Tuesday, July 21, 2009

Doing the unthinkable....

I'm considering selling off my Armored Company so that I can justify getting some of the new tanks....

That's nine tanks - each individually converted and detailed. The weathering isn't up to my current level but they're still good, solid tanks. Five also have my resin cast "extra armor" and all nine are in simple Cadian colors with unified squad markings.

Am I insane or just dedicated? Well, that's an easy one to answer so I'll skip it.

The real question is whether or not I'll actually sell all nine or try just a couple of them on eBay at a time....

Friday, July 17, 2009

Cadian Rough Rider Conversion 01

I entered a conversion competition on the RelicNews Community Forums - and while I have until October to get this guy finished I decided to jump in and get to work.

The horse and legs are those of an Empire Outrider. The torso was a simple swap. I used the greatcoat sans pistol arm and replaced it with the Sergeant chainsword. The laspistol arm is a simple swap and the head is a WFP Empire Pistolier.

The pants were sculpted with Magic Sculpt because I couldn't find my greenstuff. I like working with Magic Sculpt anyhow so I shan't cry. I decided to do the pants rolled because when I rode Western we never put our pants in our boots - because it's a good way to get stuff in your boot!

I found my greenstuff so I may add the Cadian shirttails. Otherwise there's not much left for this guy except the base and painting.

Sunday, July 12, 2009

Dark Angels Champion 02

I posted the Champion to the RelicNews Community Forum and got some good feedback. I took the advice and made some changes to the model -- my self criticism follows the image:


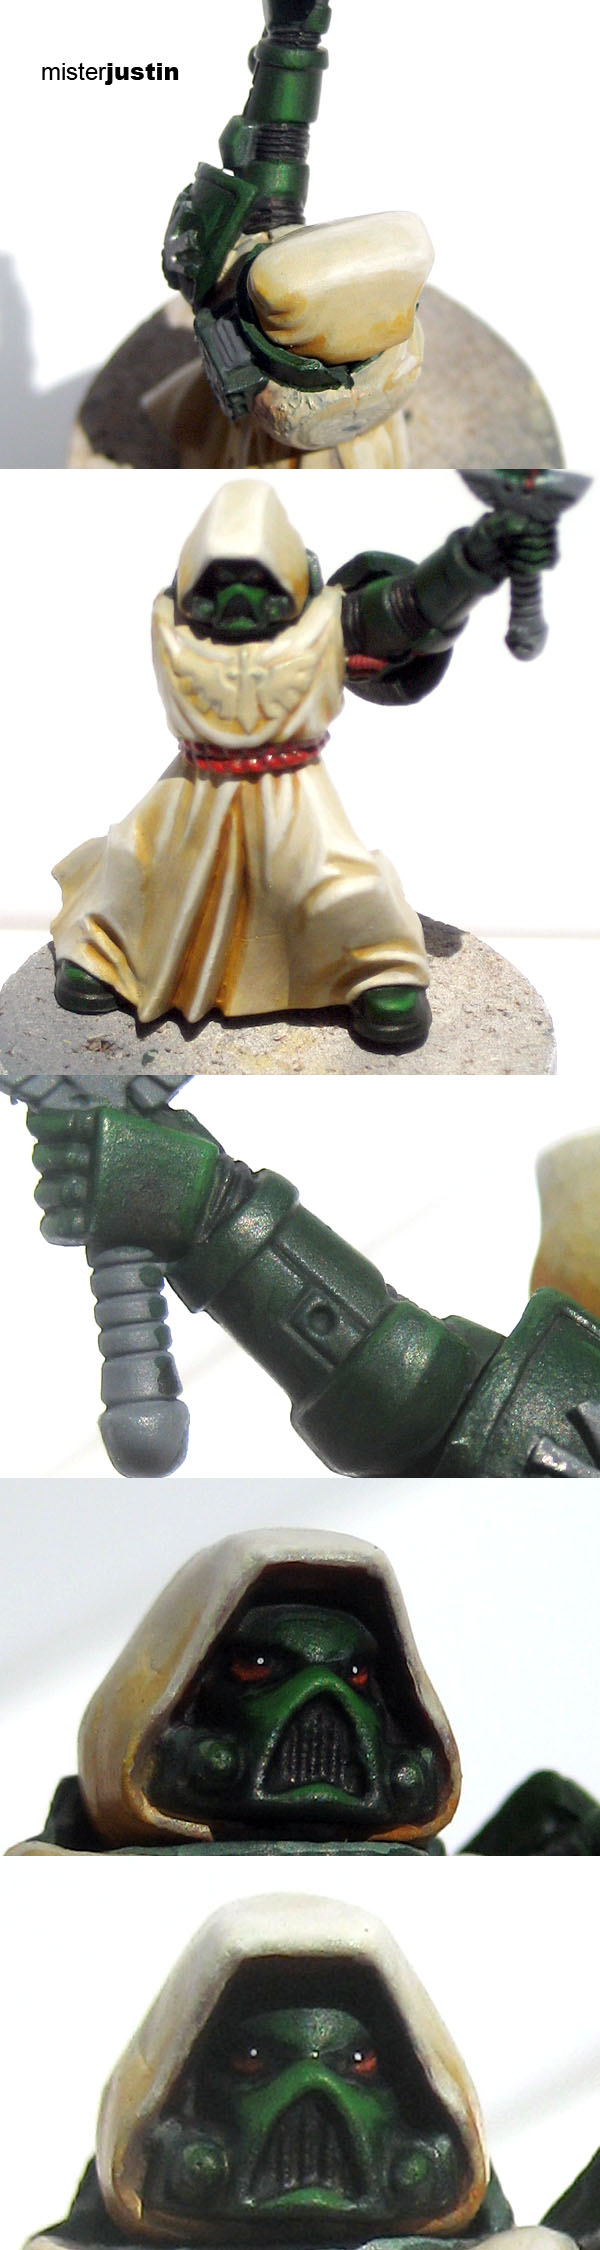
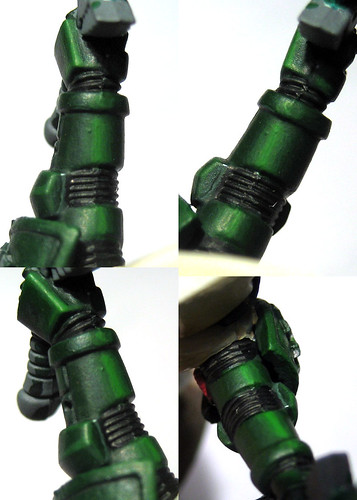
The highlights are much, much too thick. The elbow is especially sloppy. I'm not sure why and I didn't notice it until I took the photos.

Adding Snakebite to the hood made the transition much smoother - I like this change.

I need to work on smaller highlights although I think it will help to tackle the other arm from start to finish without pause. I would have been hard pressed to match any of the color I used previously to clean up the mistakes I made here so I had to leave them. I could create a NEW midtone and go backwards... but this is a practice model so I'll just do the other arm.

I would love some additional feedback! Chime in here or click through the link to RelicNews above and comment in the thread.

Bring it on, folks. Get nitpicky, be blunt and help me get to the standard I'm aiming for. In the interim I'll get to work on the next arm....

Friday, July 10, 2009

Dark Angels Champion 01

I've been feeling like my painting has really plateaued lately and I'm trying to work on the fundamental techniques -- thin paint, blended layers and attention to detail.

This means I'm doing a lot less with my army -- which wasn't much to begin with -- and taking a break from vehicle weathering for a bit.

In deciding to focus on quality painting I'm going to stick with basic models -- most likely Space Marines until I get into flesh tones -- with no conversion, etc.

This first project is a Dark Angels Champion I've wanted to do for awhile. My targets:

Bone cloth
Armor with an extreme highlight
Lens effect on the eyes
SMOOTH BLENDING!

Of course my photos don't help but I took shots from several angles so that some idea can be gleaned:


Video Tutorial - Quick Weathering Part 4: Pastel/Pigment Powders

Here is the fourth and final installment in my first weathering video tutorial series. This is a quick look at weathering with pastel/pigment powders. I weathered this a bit more heavily than I would have normally done so that it would show up on my little camera but the basic techniques are the same.

Tamiya 2.5 Ton Truck - example from the video

Video 1: Artist Pencils

Video 2: Dot Oil Filter

Video 3: Oil Grime & Rust


Wednesday, July 8, 2009

Finished Arvus Lighter Commission


I painted this model for Niroe - usually found on the Boot Camp and WIP forums - using the oil methods over a Krylon grey primer base. I used a bit of Tamiya XF-62 "Olive Drab" on the cockpit and one panel on each wing.

The engines got a bit of powder weathering to get the blue heat effect. I drybrushed the exhaust Boltgun and then Bronze before adding another blue wash.

The decals were weathered with sandpaper -- remember, before you use sandpaper on a decal it's gloss, decal, gloss and then sandpaper. If you're going to do additional weathering, like the dot oil method I used, an additional matte coat is applied first.

And unless Niroe wants to see something changed this one is finished and it's time to move on. Next up... probably another tank.

Tuesday, July 7, 2009

Video Tutorial - Quick Weathering Part 3: Rust & Grime

This is the second part of my oil weathering video - presented here as Part 3. In this video I take a quick look at applying rust and grime with oil paints.


Part 1 - Artist Pencils

Part 2 - Oil Dot Filter Method

Saturday, July 4, 2009

Imperial Guard: Winter Theme Chimera 02

I finally finished the winter theme Chimera I was working on... just in time to realize I forgot to weather the pack and the drum can on the back. Sigh. For now those oversights will get to live on as I've set the model aside already. It's time to work on something else.

I'm really pleased with how this one turned out. It was enough work that it's not something I'd do every day -- but not so much that I'm unwilling to do a Guard army to this standard. I'm still debating between my winter Guard and my traitor Guard though...

For now this is just a one-off Chimera. Enjoy.

Friday, July 3, 2009

Video Tutorial - Quick Weathering Part 2: Oil Filters

I've put together a series of video tutorials covering the basics of my three favorite weathering methods: pencils, oils and pastels. The image below shows the results of all three techniques applied over two different base coats.


The second video in the series demonstrates using small dots of water mixable oil paints to weather a vehicle. This is most commonly referred to as the dot filter method.

It cuts off at the end to stay under the ten minute maximum - and I'll post part two of this video shortly.

Thursday, July 2, 2009

Video Tutorial - Quick Weathering Part 1: Pencils

I've put together a series of video tutorials covering the basics of my three favorite weathering methods: pencils, oils and pastels. The image below shows the results of all three techniques applied over two different base coats.


The first video in the series demonstrates using artist pencils to create scratches as a foundation for later weathering.