Okay, I know, you're not here to hear about Secret Weapon Miniatures. I keep a separate blog for that. But I did think you might like to know that I've launched a 10% off sale through 4-Jan-2010.
That's worth a bit of double post action, right?
Go, spend money, help me quit my day job! I promise many neat new toys if that ever happens!
Okay, back I go to working on bases for the upcoming FTW post....
Tuesday, December 29, 2009
From the Warp: Basing and Weathering
In the off chance that someone reading this blog doesn't already know about "++ From the Warp ++ let this stand as a long overdue plug. "From the Warp" is one of two hobby sites that I visit daily. It includes original posts from a small collection of authors, an incredible blog roll (of which I am a member), collaborative posts, a massive archive of tutorials... and more.
Come January 2010 FTW will also have a regular dose of misterjustin. I'm joining the author roll to post a monthly series on basing and weathering techniques. This will cover a variety of products and methods for weathering models and/or putting them on unique and expressive bases.
My hope is that readers will barrage me with questions and that my series will become a reflection of tutorials based on community request.
I'll post an update here when the series launches - and in the interim go check out FTW and bookmark it if you haven't already!
++ From the Warp ++
Friday, December 25, 2009
Vostroyan Army: Leman Russ A01

I have started re-painting the first tank in my old Armored Company. This allows me to recycle those tanks AND work on the techniques I'll be using on my Games Day 2010 entry... without having to improve them while painting my Forge World model.
Sorry about the shine but there's a layer of gloss on there.
I took some step-by-step photos but I've gone back and redone much of it so I'll get a new series when I settle on the process. This guy still has quite a ways to go AND WILL BE PART OF MY ARMY! This model WILL see game play.
Feedback is very welcome and I'm happy to answer any questions. Thanks in advance!
Photos of the original Armored Company can be seen in the "Armored Company" tag.
I may still sell a couple of those tanks since they don't really fit the Vostroyan army... but for now I'm glad to have finished tanks to start painting.
Saturday, December 19, 2009
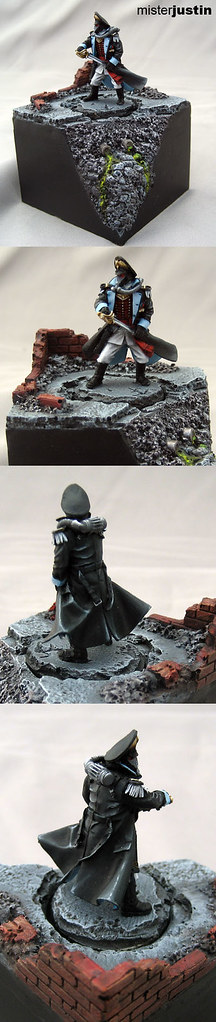
Competition Mini: Pedro Kantor - FINISHED
 That's all she wrote. I haven't had the time here at the end that I would have liked. This means I'm leaving a few things "unfinished" on this guy. I am, however, very happy with the end result.
Final feedback is quite welcome - but I don't know that I'll be able to change anything this late in the game.
Thanks for following along. The competition will be posted next week:
http://forums.relicnews.com/forumdisplay.php?f=110
Wednesday, December 16, 2009
Competition Mini: Pedro Kantor - Banner Edition!
 The front of the banner is finished and the model is one step closer to being ready for the competition. I still need to do a few small things:
1. Touch up the tabard
2. Finish highlighting the storm bolter (which is now metallic blue)
3. Add mud to his feet
4. Paint the back of the banner
I really am happy with how this has come together even if the highlights/blending still miss the mark I was aiming for. There's nothing here for me to complain about and I think it'll make a nice showing in the competition.
Of course the prize support is being provided by Secret Weapon Miniatures... so I'm not sure what happens if I win. I might just need to send myself a gift certificate.
Saturday, December 12, 2009
Competition Mini: Pedro Kantor - ONE WEEK LEFT!!!!!
 What I've done:
1. Added mud to the cracked earth base
2. Re-applied the mud on the Rhino
3. Re-painted the right shoulder for a smoother blend (12 layers now)
4. Added the base colours for the metal
5. Added a blue wash to all of the white armor
6. Added a blue wash to all of the blue armor
Things I still need to do:
1. Clean up the mud in the gravel on the base
2. Re-paint the script on his leg
3. Finish the storm bolter w/ blue glazes
4. Paint the banner
5. Take your feedback into account
I know that I have more than one shade of blue on this guy - but that's the result of trying to improve my methods from section to section. That's also one of the reasons I re-painted the right shoulder; it looked VERY dark and should be the brightest.
All-in-all I'm quite pleased. It's not a Games Day model but it's certainly my best effort so far. I've spent more time on this model than anything else I've painted. The Titan will be finished in less time than this guy. Thanks to the feedback I've gotten I know what I still need to improve on and look forward to my next attempt.
Thursday, December 3, 2009
Competition Mini: Pedro Kantor - The Home Stretch!
 I finally feel like this guy is really starting to come together. There are plenty of things I'm not happy with - the dual zenithal lighting effects, for example - but I think it'll be a good showing for the competition.
If nothing else this model has been a real stretch for me. I know that I can create a strong model when I slow down and take my time a bit.
I would, of course, love some feedback. Don't be shy. Nitpick. Please!
Sunday, November 29, 2009
Competition Mini: Pedro Kantor - DOUBLE UPDATE EDITION!
 It's AMAZING! Two updates in the same weekend and on the same model. I honestly can't remember the last time I've done this.
I'm still really pleased with the lenses on the helmet and I'm beginning to be happy with the blue. At this point I would consider his right side - the power fist side - finished except for the detailing. The blue is a lot brighter than I had intended but the upper left image gives a decent look at how it's turning out. I can't really complain even if I'd planned for it to be much darker.
I still have nearly a month to go before the competition closes. I've already spent more time on this model than I have on any model in the past. I'm really trying to slow down, take my time and go back to correct tiny imperfections. Of course at some point I have to draw the line and decide it's good enough - which I've done a couple of times already.
And now... hell, I actually have more time to paint!
Saturday, November 28, 2009
Competition Mini: Pedro Kantor - the Blue Edition
 I've finally been able to make some time to start in on the blue. The bottom left image is the only one that does any justice to the transitions - but the top left does a fair job of showing the three layers of blue that I used.
I'm.... reasonably pleased. Barring feedback to improve the blues I would consider his right arm and helmet finished. Of course it's likely that I'll come back and change this entirely when I start work on the rest of the blue and wind up happier with the newer sections. That's the curse of painting in shifts though.
Sunday, November 22, 2009
Vostroyan Sniper - Snow Theme Competition
 There are a lot of things about this guy I would change if I were going to start over - but given that I'm painting him in quick and dirty strokes I'm fairly pleased. I do need to get some better photos but I wanted to get something up for feedback while I had some free time.
All of the basing was done with the Instant Scenery Kit - Winter from Secret Weapon Miniatures. I'm really pleased with how well the products work and how easy it was to get a detailed base finished in a hurry. I still haven't made a dent in the mock-up box even though I've done this base and covered one of my display bases in snow.
On to the next project for a bit... goodness knows I have enough of them!
Saturday, November 14, 2009
Warhound Titan - Left Leg
 I did some trading with master model builder Psypath awhile ago and am finally getting around to painting this fantastic piece. This is the left leg of a Warhound Titan, scratch build of course, done in a three colour block urban camo scheme. I will do all of the shading with oils and most of the highlighting with the dot filter method.
I'm not going to do a lot of weathering on this guy beyond a bit of chipped paint on the toes and seams. I plan to keep it pretty simple and try to keep from getting carried away on the fluffy techniques. It is, after all, intended for the tabletop so I don't want weathering powders falling off anyway.
The camo was applied in three layers, over a grey primer, using masking tape. There was a bit of bleeding that I need to clean up but I am otherwise pretty pleased with the result. I'm excited to see how it looks with some detailing....
Vostroyan Sniper - Snow Theme Competition Mini
 This guy is getting into a winter theme competition but I decided to paint this guy army fashion - meaning quick and with little or no mixing - to see if I could develop a decent recipe for my army I'm a little over an hour into this guy and I'm pretty pleased.
I'm not using a Secret Weapon base for this guy (GASP!) because I wanted to see what I could do using just the materials in the new Instant Scenery Kit: Winter -- so this is a stock GW base with materials from that kit.
I'd hoped to finish him in under two hours but I think I'll break that by just a bit while I play with getting the snow and weathering right. I can live with that.
Feedback is very welcome - and I'll try to get some better photos, of course.
Sunday, November 8, 2009
Competition Mini - Power Fist Redo
 The longer I stared at the power first the more I realized that while the blending was good the highlighting didn't provide enough contrast. I've added several new highlights and actually did bring it up to GW Blazing Orange - even going so far as to add a touch of white.
The white accents - being the laurels and skulls - still need some work. And I'm likely to add a bit more highlighting to the fingers. The freehand on his shoulder spells "RYNN," the homeworld of the Crimson Fists, but I'm not pleased with how it turned out and will redo it. Hopefully I can come up with something more interesting to freehand there too.
I am much happier with the model at this point. I have now spent more time on this power fist than I do on most of my models. I hope that the effort shows when it gets to the competition.
Saturday, November 7, 2009
Competition Mini: Pedro Kantor - Power Fist Edition
 At this point I consider the power fist more or less finished. I'd love some feedback though.
I'm going for a darker red on this one so I didn't want to go up to pure orange. The area next to the laurels on the fist is intentionally dark to help balance the colour since the laurel will be white when it's finished.
Wednesday, November 4, 2009
Competition Mini: Pedro Kantor
 And so it begins...
This is the start of my Pedro Kantor for the "Single Mini" category of the quarterly competition over at Relic News. There is a long, long way to go and only the eyes are finished at this stage... and those may change if I get some feedback.
The accents will all be in white. On the armor this will be shaded with grey and on the cloth with brown. The blue on the armor will be shaded by mixing the dark red with the base blue. Likewise the red will be shaded using the blue. This gives me a palette limited to red, black, white, brown and blue.
I have some stiff competition and would love some feedback.
Monday, October 26, 2009
Commission: Blood Ravens Terminators - revisited
 After sending out my original "finished" photo I got a request to break up the red on the shields. Although I'd already exceeded my original time allotment I wasn't happy with those shields either so I went ahead and added some "stone" to them. I'm reasonably pleased with the final effect and think it goes a long way to help break up the uniformity of the red.
I added the Chaplain into a couple of the shots to contrast the quality of the paint jobs and to show the squad as a whole.
All-in-all I'm still pleased with how adding the red highlights with the airbrush worked out and how the squad came together. If I had some additional time I probably would have gone in and added some extreme edge highlights to really add some contrast -- but I can't complain with how things turned out.
This one is packed and on its way
Tuesday, October 20, 2009
Averland Steam Tank
 One week after launching Secret Weapon Miniatures I started a new day job. I've been so busy that I haven't had much time for painting. Well bugger that!
I get together with a group of folks on most Monday nights to paint and so I finally got back to my Steam Tank. Oh, sure, I did some work on the Imperial Guard Command Squad for my trench base display... but that's beside the point!
There is a lot of work left to be done before this model matches the vision I have for it. I am going to pay special attention to the Engineer sticking out of the top - which will remain removable so I can show off the interior - since he needs to be as weathered as his vehicle.
The base still needs some "wet" mud, a layer of gloss and a bit of additional detailing. I'm happy with how it is coming together though. Likewise all of the body weathering will see some additional work - and I still have to add the decorative elements. So very much left to do.
I'm only taking this model and the Command Squad with me on Monday nights for awhile though. Hopefully this means I'll have another update next week.
Sunday, October 18, 2009
Commission: Blood Raven Assault Terminators
 These guys are the match for the Terminator Chaplain that I finished recently.
Since I've given up painting squads at a lower standard this commission was a bit tricky for me. I had a time limit of two hours per model - not counting clean-up and construction - which isn't a lot of time even for batch painting. I saved some time by using the airbrush for the red with the following recipe:
Base Coat: 2:1 VGC "Scar Red" and VMC "Red Black"
Pre-Shade: VMC "Red Black"
First Highlight: 1:1 "Scar Red" and "Red Black"
Second Highlight: "Scar Red"
Third Highlight: 1:1 VGC "Bloody Red" and "Scar Red"
The second and third highlight were applied in one direction from the same angle. This creates a quick zenith highlight.
The rest was detailing and quick freehand. I managed a bit of a lens effect on the eyes with GW "Dark Angles Green," "Scorpion Green" and a dot of white.
The bases are Secret Weapon: Urban Streets bases. These were simply drybrushed in two shades of grey over the Foundation granite colour.
I managed to get to this stage just at the ten hour mark. I still have some clean-up to do but I am reasonably pleased with how they turned out given the time constraint. Unless I hear otherwise from the client I'll set these aside and get back to my Steam Tank...
Friday, October 16, 2009
Quick Tip: Washing Instructions
Only use cold water when cleaning your brushes. This includes using cold water in your cleaning cup or tub and on those occasions when you take a brush to the sink. Hot water will weaken the glue that holds those hairs together and shorten the life of your brush.
If you have really stubborn paint stuck in the bristles use a bit of dish washing soap, or brush cleaning soap, and cold water to clean things up.
If you have really stubborn paint stuck in the bristles use a bit of dish washing soap, or brush cleaning soap, and cold water to clean things up.
Sunday, October 11, 2009
Commission: Blood Ravens Terminator Chaplain - FINISHED
 With the exception of the chunky sculpt on the ammo - which may have more to do with the mold than the sculpt - I really can't say enough good things about this model. I love it. It says "Bad Ass Chaplain" in every way.
The display base was cobbled together from a failed cast and liberal application of the belt sander. I just felt this guy needed a little something to make him stand out on the shelf when not in play. It was a surprise for the commission and I didn't charge for it.
Feedback is, as always, very welcome. The Assault Terminators are next in the queue....
Tuesday, October 6, 2009
Winter Guard Command Squad
 When I finished painting up the "Trench Works" squad display base for Secret Weapon I knew that I had to revisit my winter themed Imperial Guard. I went out and picked up a Cadian Command Squad and used it out of the box with the addition of Pig Iron heads.
The bases and display stand will all get a healthy dose of brown grass and snow before this thing is finished. I also haven't settled on how I'm going to arrange folks on the base - although I'm reasonably happy with how I have them set out at the moment.
The only conversion is on the banner arm. Unfortunately the Cadian banner is in the right hand and the regimental banner is in the left. I really wanted to use the bandaged arm, in keeping with my intended theme, which meant I had to cut the banners off of the pole and shoulder they were attached to.
I'm trying to sneak in more time on this between the current commission and all of the Secret Weapon work I'm trying to get done -- so hopefully I'll have an update soon.
Commission: Blood Ravens Terminator Chaplain
 A bit of an update on the Blood Ravens Terminator Chaplain today. There's still quite a bit to do before this one is finished but I'm much happier with this set of photos. You can almost see the layering and blending on the black - not bad for my crappy little camera!
I'm not happy with the detailing on the stormbolter shells so I'll redo that. The right pauldron is finished, except for the gold, and I'm happy with how the icon and red detailing turned out. I'm also very happy with the skull helmet at this point but need to touch up the bone on his chest.
This guy is almost ready to mount to a base and I hope to have him finished this week. At this point I'm waiting for some feedback from the client before I move on.
Friday, October 2, 2009
Commision: Blood Ravens Terminator Chaplain
 I'm already in love with this model. I've wanted to paint one for a long time and jumped at the opportunity to take this commission. Of course the photo isn't what I'd like it to be but it's a fair representation on how this is coming together.
The black armor on the body is finished and actually has a VGC "Terracotta" glaze over it to add a red tint. It was highlighted in four layers - only the most extreme of which seems to have made the photo.
The bone was actually built up from "Desert Yellow" and washed with the GW "Devlan Mud" wash. I added some of the wash to a 2:1 "Desert Yellow" and "Bleached Bone" mix and then added more "Bleached Bone" before adding a touch of white for the final highlight.
The gold and red have been base coated but not otherwise started yet. The eyes... well, I'm going to redo the eyes. Although it didn't show up in the photo I'm not happy with the lens effect.
I'll work on getting a better photo this weekend after I've made a bit more progress. In the interim - enjoy!
Tuesday, September 29, 2009
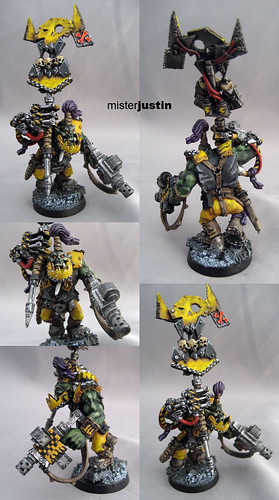
Ork Biker

I haven't had much opportunity for painting in the past few weeks but did manage to get this Ork biker finished and mounted. He is, of course, sitting on a Secret Weapon "Trench Works" bike base.
There are a few things I'll do differently on the next Ork biker I do - but I'm pretty pleased with the overall result on this guy. Although I couldn't get the rays into the freehand did sneak in the sun and some tiny, tiny checks.
These are brilliant and fun models and I hope to paint more.
Saturday, September 26, 2009
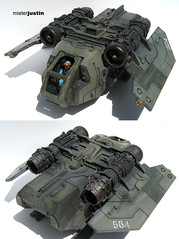
Commissioned Forge World Vulture - FINISHED!
 Barring any changes, corrections or additional weathering requests from the client this bad boy is finally finished.
I'm very pleased with the overall result and will be re-using this yellow recipe on future projects. The shading really pops and allows for some decent weathering effects.
The cockpit is fully detailed although painted to a lower standard than the rest since it won't be visible through the black frosted glazing.
There are a couple of little things I might have done differently if this were my model. Namely more decoration on the wings - stripes or aquila wings most likely - and perhaps some checkers somewhere. I don't know why but this thing really screams out for some black/white checkers to me. Red/white checkers might work too.
Maybe I'll use this as inspiration for an Imperial Fist vehicle or a Bad Moons stompa...
Tuesday, September 22, 2009
Secret Weapon Update
This will be the last time I cross post about Secret Weapon Miniatures. But I just can't miss an opportunity to announce that the international flat rate shipping option is live ahead of schedule.
If you haven't already done so check out the Secret Weapon Blog for updates on the bases and conversion accessories coming out of the queue -- including new photo etched brass items!
There's also a product launch sale going on - click through to take advantage of it while you can!

And now, back to your regularly scheduled misterjustin painting goodness....
If you haven't already done so check out the Secret Weapon Blog for updates on the bases and conversion accessories coming out of the queue -- including new photo etched brass items!
There's also a product launch sale going on - click through to take advantage of it while you can!
And now, back to your regularly scheduled misterjustin painting goodness....
Monday, September 21, 2009
Video Tutorial: Salt Chip Weathering
 With Secret Weapon Miniatures up and running I finally had a few minutes today to get the oft' requested tutorial on salt chip weathering put together.
This is just a very quick look at salt chip weathering using Krylon aerosol sprays for the base coat and the top layer. I would normally do all of the painting with my airbrush so that I could shade and highlight while I was working, but just wanted to demonstrate the basics for this technique.
If you're trying this with an airbrush for the first time let me stress one important point: wait a LONG TIME for your paint to dry! If you try to rinse off the salt too early you can easily wash all of your hard work away in the process. If you have the patience let the model sit over night in a warm, dry environment - but at least give it a couple of hours.
Saturday, September 19, 2009
Secret Weapon Miniatures
++ From the Warp ++ just posted an "In depth review: Secret Weapon Miniatures" that I'd like to recommend.
You can also head straight over to Secret Weapon Miniatures to see the latest, greatest thing in resin bases. All of my commission pieces, and my army, are based on Secret Weapon products.
Rumor has it conversion accessories are already on the way.
Go. Spend money. People will find you more sexually attractive if you own Secret Weapon bases.*
* This does not constitute a guarantee that using Secret Weapon products will make you more sexually attractive but, really, why not buy some anyway. It can't hurt.
Sunday, September 13, 2009
Averland Steam Tank - The Base
 WIP shots on the base for the steam tank.
The white in the first image is PVA that will dry clear to form a small stream. There are rocks and texture beneath the PVA to add to the effect.
The second shot shows the depth at which the wheels will be submerged in "mud" - an effect that I'll add to by adding more dirt and then coating everything with gloss.
The third image gives a glimpse of the track ruts... and the rough edge of the putty that I still need to file. I moved the model itself to the extreme front of the base so that some of the detail will be visible after I attach the s'tank.
The last photo is a WIP shot of teeny tiny cattails. After the glue dries I'll prime and paint them before adding paper leaves and attaching them to the base around the stream... under the tank. Yup, nearly invisible detailing. Why? Because it should be there.
Thursday, September 10, 2009
Averland Steam Tank

I haven't had an opportunity to work on a Warhammer Fantasy piece in a long time and when the plastic Steam Tank came out... well, I've been sitting on this model for awhile. Since I was already working with yellow in the airbrush, and had planned to paint this tank in the black/yellow Averland colours, the time was ripe for Steam Tankage.
The model will eventually be mounted on a base that gives the impression of mud and rain. The idea being a long, drawn out campaign as would have been common for troops on foot and horseback. If I ever get around to an Empire force I'll stick with Averland colours and the same theme.
Nothing is glued down at this point and I have a long way to go before I start making things permanent. I will also make the top removable so that the interior can be fully detailed and visible.
Friday, September 4, 2009
September Painting Special - 20% Off Special Characters
 It's time for another monthly painting special. This time I'm including something for both WFB and 40k players.
20% off any special character
All single 40k models will receive a display quality base at no additional charge.
I'm running this special for the entire month of September on a first come, first served basis. You don't need to have the model completed in September, you just need to have your order in before the end of the month.
UPDATE: I changed the special to reflect a 20% discount on *ANY* special character model. This includes named models and special units like Regimental Advisers.
Wednesday, September 2, 2009
Commissioned Forge World Vulture 01
I got back from a two week holiday on Monday and started work on a new commission.
The yellow recipe was painted with an airbrush using:
GW "Golden Yellow" (GY)
GY + VMC "Light Yellow" (LY) 2:1
GY + LY 1:1
LY
This was shaded with a glaze of GW "Dark Flesh" generously thinned and likewise applied with the airbrush. Preshading was done with a mix of black and GW "Dark Green" with just a tiny touch of the latter.
Photos were taken in natural, diffused light. Lack of shadows in the backgrounds gives an idea of how the shading/highlighting actually turned out. The last two images do a good job of showing the more subtle transitions.
Decals and the engine are next - weathering will come later.

Sunday, August 16, 2009
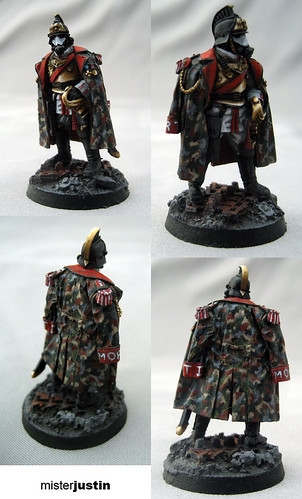
Commissioned Krieg Command Vanquisher

I've been very busy with super secret projects - but wanted to get an update on the Krieg Command Vanquisher before I head out on a two week holiday.
I've picked out some of the detailing, applied an oil filter to the camo, some pencil weathering and otherwise gotten it ready to tackle the last touches. I probably have another two hours to go before I'll be happy to set this one aside. Vehicles like this are quick and fun and it only take a bit of weathering to make them stand out.
More to come....
Thursday, July 30, 2009
August Painting Special - 20% Off Empire Wizards!
 I'm launching my first commission discount special for the month of August, 2009.
Any Warhammer Fantasy Battles Empire Wizard at 20% off the total cost!
This includes conversion and painting work on any WFB Empire Wizard!
I'm running this special for the entire month of August on a first come, first served basis.
If this special is a success I will likely launch other discounts in the future - so jump in and get your Empire Wizard at 20% off while you can!
Wednesday, July 29, 2009
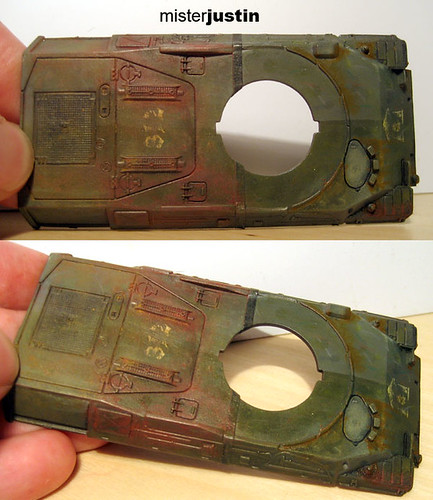
Commissioned Krieg Army - Command Vanquisher
I haven't posted a lot of photos of the Krieg army - at least not WIP shots - so I decided to post the start of this Command Vanquisher.
The model was put together by the client - Niroe if you're on Boot Camp or WIP - and the conversion work is his. I did a little bit of quick work on the seams for the double track guards but it's still a bit visible.
All three colors on the tank came out of Krylon spray cans - the camo colours tan, green and brown. From here I'll add a filter wash to blend things a bit and then drybrush. The work on this one should be reasonably quick.

More Krieg under the label...
Wednesday, July 22, 2009
Dark Angels Champion - Take 5
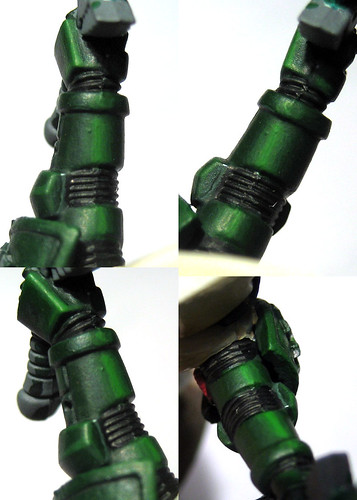
The last post was "Dark Angels Champion 02" and I'm jumping right in with number five.
Well, except for the first frame the photo quality is rubbish - but I re-painted the arm and shield on this guy and I am MUCH happier with the results.
I have NOT done the shading....
So the arm isn't finished. I think the eyes are though. I managed a very small Blazing Orange highlight in the bottom corners. Pleased doesn't begin to cover it.
Next up are the midtone touch-ups and the shading.

It didn't get a post of its own - but the "before" version of this arm is in my flickr stream.
Tuesday, July 21, 2009
Doing the unthinkable....
I'm considering selling off my Armored Company so that I can justify getting some of the new tanks....
That's nine tanks - each individually converted and detailed. The weathering isn't up to my current level but they're still good, solid tanks. Five also have my resin cast "extra armor" and all nine are in simple Cadian colors with unified squad markings.
Am I insane or just dedicated? Well, that's an easy one to answer so I'll skip it.
The real question is whether or not I'll actually sell all nine or try just a couple of them on eBay at a time....
Friday, July 17, 2009
Cadian Rough Rider Conversion 01
I entered a conversion competition on the RelicNews Community Forums - and while I have until October to get this guy finished I decided to jump in and get to work.
The horse and legs are those of an Empire Outrider. The torso was a simple swap. I used the greatcoat sans pistol arm and replaced it with the Sergeant chainsword. The laspistol arm is a simple swap and the head is a WFP Empire Pistolier.
The pants were sculpted with Magic Sculpt because I couldn't find my greenstuff. I like working with Magic Sculpt anyhow so I shan't cry. I decided to do the pants rolled because when I rode Western we never put our pants in our boots - because it's a good way to get stuff in your boot!
I found my greenstuff so I may add the Cadian shirttails. Otherwise there's not much left for this guy except the base and painting.

Sunday, July 12, 2009
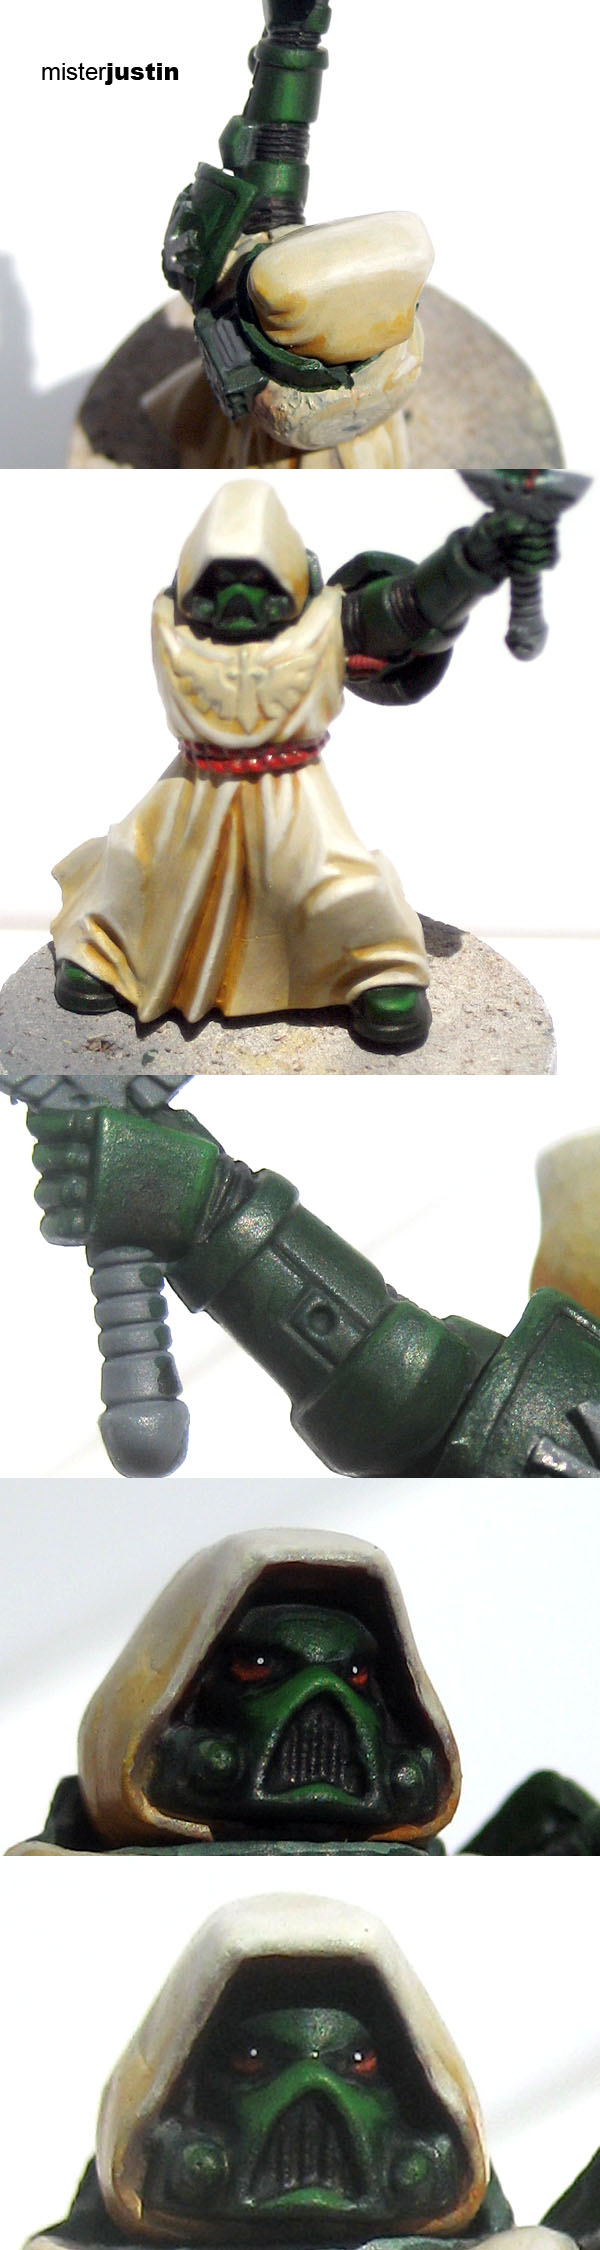
Dark Angels Champion 02
I posted the Champion to the RelicNews Community Forum and got some good feedback. I took the advice and made some changes to the model -- my self criticism follows the image:

The highlights are much, much too thick. The elbow is especially sloppy. I'm not sure why and I didn't notice it until I took the photos.
Adding Snakebite to the hood made the transition much smoother - I like this change.
I need to work on smaller highlights although I think it will help to tackle the other arm from start to finish without pause. I would have been hard pressed to match any of the color I used previously to clean up the mistakes I made here so I had to leave them. I could create a NEW midtone and go backwards... but this is a practice model so I'll just do the other arm.
I would love some additional feedback! Chime in here or click through the link to RelicNews above and comment in the thread.
Bring it on, folks. Get nitpicky, be blunt and help me get to the standard I'm aiming for. In the interim I'll get to work on the next arm....
Friday, July 10, 2009
Dark Angels Champion 01
I've been feeling like my painting has really plateaued lately and I'm trying to work on the fundamental techniques -- thin paint, blended layers and attention to detail.
This means I'm doing a lot less with my army -- which wasn't much to begin with -- and taking a break from vehicle weathering for a bit.
In deciding to focus on quality painting I'm going to stick with basic models -- most likely Space Marines until I get into flesh tones -- with no conversion, etc.
This first project is a Dark Angels Champion I've wanted to do for awhile. My targets:
Bone cloth
Armor with an extreme highlight
Lens effect on the eyes
SMOOTH BLENDING!
Of course my photos don't help but I took shots from several angles so that some idea can be gleaned:
Video Tutorial - Quick Weathering Part 4: Pastel/Pigment Powders
Here is the fourth and final installment in my first weathering video tutorial series. This is a quick look at weathering with pastel/pigment powders. I weathered this a bit more heavily than I would have normally done so that it would show up on my little camera but the basic techniques are the same.
Tamiya 2.5 Ton Truck - example from the video
Video 1: Artist Pencils
Video 2: Dot Oil Filter
Video 3: Oil Grime & Rust
Tamiya 2.5 Ton Truck - example from the video
Video 1: Artist Pencils
Video 2: Dot Oil Filter
Video 3: Oil Grime & Rust
Wednesday, July 8, 2009
Finished Arvus Lighter Commission
The engines got a bit of powder weathering to get the blue heat effect. I drybrushed the exhaust Boltgun and then Bronze before adding another blue wash.
The decals were weathered with sandpaper -- remember, before you use sandpaper on a decal it's gloss, decal, gloss and then sandpaper. If you're going to do additional weathering, like the dot oil method I used, an additional matte coat is applied first.
And unless Niroe wants to see something changed this one is finished and it's time to move on. Next up... probably another tank.
Tuesday, July 7, 2009
Video Tutorial - Quick Weathering Part 3: Rust & Grime
This is the second part of my oil weathering video - presented here as Part 3. In this video I take a quick look at applying rust and grime with oil paints.
Part 1 - Artist Pencils
Part 2 - Oil Dot Filter Method
Part 1 - Artist Pencils
Part 2 - Oil Dot Filter Method
Saturday, July 4, 2009
Imperial Guard: Winter Theme Chimera 02
I finally finished the winter theme Chimera I was working on... just in time to realize I forgot to weather the pack and the drum can on the back. Sigh. For now those oversights will get to live on as I've set the model aside already. It's time to work on something else.
I'm really pleased with how this one turned out. It was enough work that it's not something I'd do every day -- but not so much that I'm unwilling to do a Guard army to this standard. I'm still debating between my winter Guard and my traitor Guard though...
For now this is just a one-off Chimera. Enjoy.
Friday, July 3, 2009
Video Tutorial - Quick Weathering Part 2: Oil Filters
I've put together a series of video tutorials covering the basics of my three favorite weathering methods: pencils, oils and pastels. The image below shows the results of all three techniques applied over two different base coats.
The second video in the series demonstrates using small dots of water mixable oil paints to weather a vehicle. This is most commonly referred to as the dot filter method.
It cuts off at the end to stay under the ten minute maximum - and I'll post part two of this video shortly.
The second video in the series demonstrates using small dots of water mixable oil paints to weather a vehicle. This is most commonly referred to as the dot filter method.
It cuts off at the end to stay under the ten minute maximum - and I'll post part two of this video shortly.
Thursday, July 2, 2009
Video Tutorial - Quick Weathering Part 1: Pencils
I've put together a series of video tutorials covering the basics of my three favorite weathering methods: pencils, oils and pastels. The image below shows the results of all three techniques applied over two different base coats.
The first video in the series demonstrates using artist pencils to create scratches as a foundation for later weathering.
The first video in the series demonstrates using artist pencils to create scratches as a foundation for later weathering.
Tuesday, June 30, 2009
About my commission work....
I am currently accepting commission work. I quote a firm MAXIMUM cost prior to starting work. If I go over there is no charge for the extra time - if I'm under my estimate you keep the difference.
All of the models I paint are individually painted and detailed - I will never "dip" or mass drybrush your models. My goal is to give you something I'd be happy to have on my own table every time. Even "lower tier" models get layered highlights and detailing.
Check out the "Testemonials" label to see what folks have said about working with me -- and the pieces below are fair representations of what I do on commission these days.
If you have a project you'd like to discuss please email misterjustin at gmail with the information. I'll get back to you as quickly as I can and, if you like, get a current or former client in touch with you so you can talk to them about their experience.
 |  |
 |  |
 | |
Thursday, June 25, 2009
Tau: Pathfinder Shas'Ui
I got this guy as part of the miniature exchange on the Relic forums and am entering him into the exchange competition.
I decided to weather Shas'Ui only slightly but to really go to town on the shield drone. I figured the shield drone would be old, weathered and pretty damaged from soaking up shots. I didn't repair the gap in his power line only because I'm a lazy git. This was my first Tau and I really enjoyed painting him.
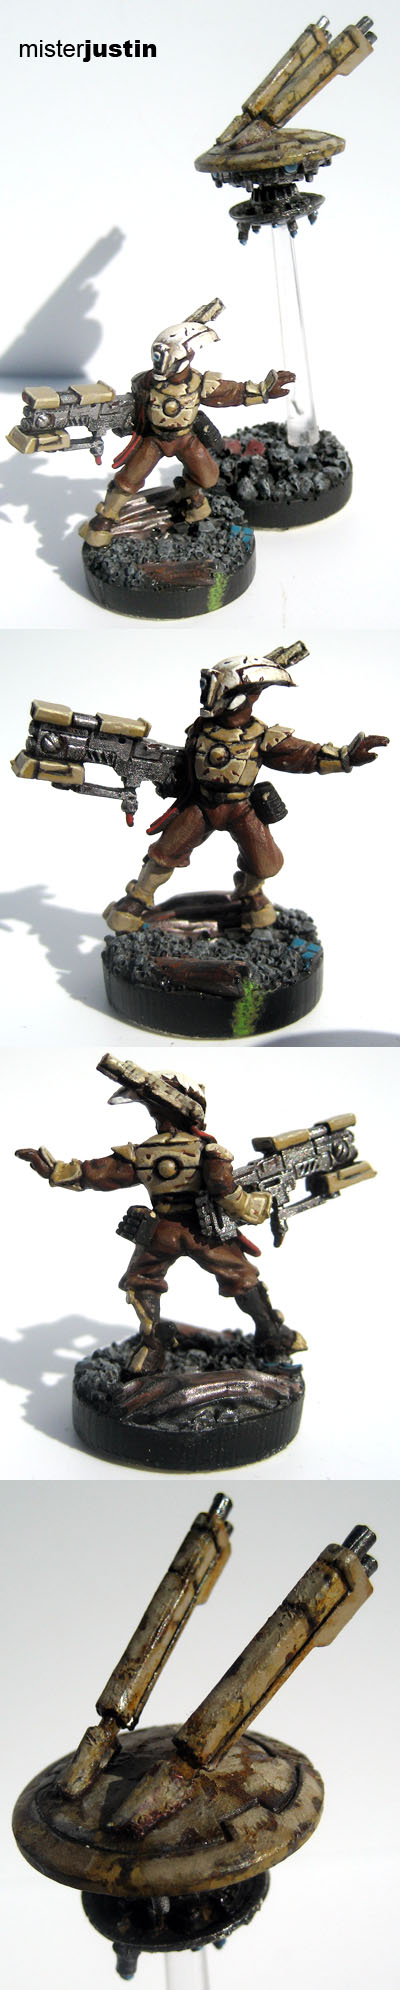
I decided to weather Shas'Ui only slightly but to really go to town on the shield drone. I figured the shield drone would be old, weathered and pretty damaged from soaking up shots. I didn't repair the gap in his power line only because I'm a lazy git. This was my first Tau and I really enjoyed painting him.
Tuesday, June 23, 2009
Hello Toycutter
This is just a quick hello to anyone coming to the site for the first time via TOYCUTTER. Thanks for the write-up of my commissar!
http://www.toycutter.com
http://www.misterjustin.com/2009/05/commissar-01.html
http://www.toycutter.com
http://www.misterjustin.com/2009/05/commissar-01.html
Monday, June 22, 2009
Quick Tip: Brush Tub
The photo is a three cavity painting tub. I picked this one up at Michael's Arts & Crafts in the USA for $1.99 -- although I wasn't able to find one on their website. It is, without exception, the only thing other than paints, brushes and models that I think every hobby painter MUST OWN.
This will extend the life of your brushes dramatically. Add a bit of brush cleaning soap - some people use regular dish soap - in the big chamber and it's even better. If I had to give up all of my fancy gadgets and tools but for one this is what I'd keep.
Friday, June 19, 2009
Quick Tip: Gloss vs. Flat Sealer
A gloss sealer will give the model a smooth, glass like finish; a flat or matte sealer has a rougher texture. But Gloss and flat sealers do more than change the finish on a model.
For instance, decals are easier to apply, and will last longer, on a gloss surface.
Here's a quick breakdown of which surface is better for various techniques:
Knowing which sealer to apply for which technique will help you decide in which order to apply weathering techniques.
For instance you should always apply a gloss layer before and after applying decals. However putting gloss over pigments/pastels will likely make most of your effort disappear.
For instance, decals are easier to apply, and will last longer, on a gloss surface.
Here's a quick breakdown of which surface is better for various techniques:
| Gloss | Flat/Matte |
|---|---|
| Overall washes | Oil filters |
| Decals | Panel line washes |
| Protect acrylics | Drybrushing |
| Oil filter (dot method) | |
| Pastels/Pigments |
Knowing which sealer to apply for which technique will help you decide in which order to apply weathering techniques.
For instance you should always apply a gloss layer before and after applying decals. However putting gloss over pigments/pastels will likely make most of your effort disappear.
Monday, June 15, 2009
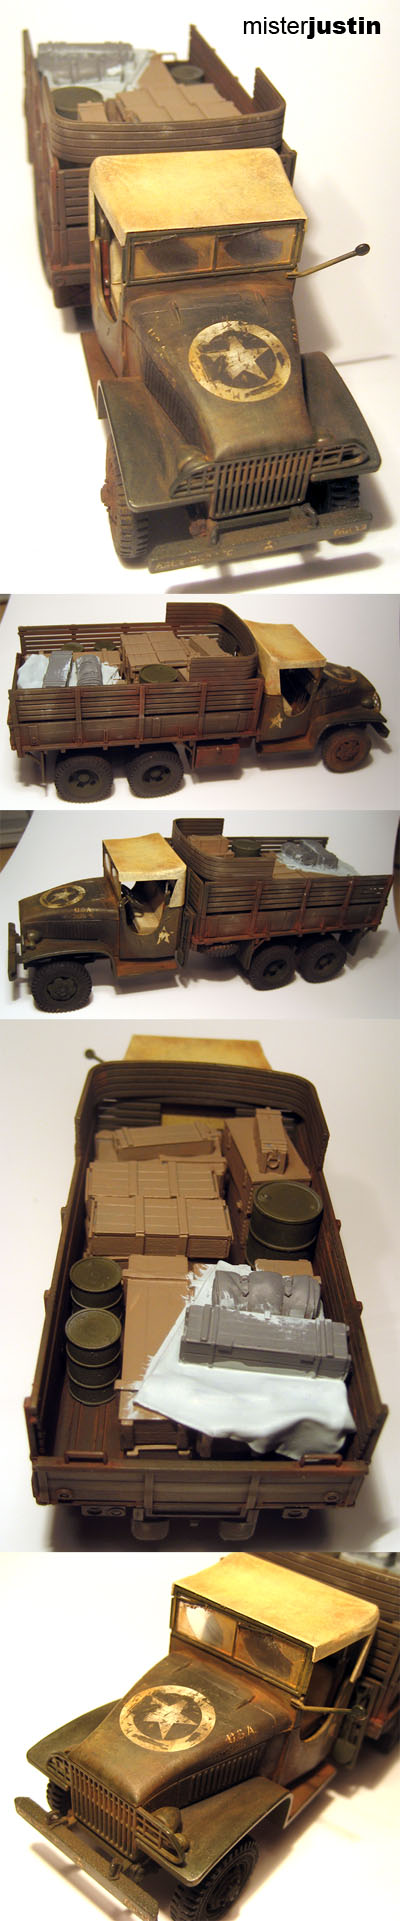
GM 2.5 ton 01
It's time for an update on the 2.5 ton truck:
Although not strictly accurate I'm going to paint the canvas over the cargo as an American flag.
The truck was painted using the oil filter and pigment weathering methods - the latter of which I've already posted a tutorial for. I hope to have the oil filter tutorial finished shortly.
There will also be a generous coating of mud in place before the model is finished -- complete with a mud tutorial.
Mmm, it must be tutorial season....
Friday, June 12, 2009
Weathering With Pastel Powders
While considering which weathering tutorials to write up and where I would start I realized I have a Tamiya 2.5 Ton Cargo Truck sitting on my desk. Although it's not a 40k I'm going to use most of the techniques in my arsenal to get it finished and realized this made it the perfect tutorial project.
First up is an introduction to weathering with pastel powders. I'm using "Doc O'Brien's" for this tutorial. I'm happy with the product, and you get a few colours it's harder to match with art store pastel sticks, but you can do this much less expensively with generic art pastels and some sandpaper.
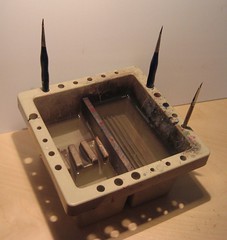
This is the un-weathered cab. I have base coated the interior and painted the seats.

The colors I'm using are "Rust Red," "Rust Brown," "Grimy Black" and "Dirt Brown." I will use Testors enamel thinner sparingly as we go - and that bottle will likely last me several years.

I bought a $3 pack of crappy brushes to use with powders. I took one of them and cut it off about 10mm or 1/4" from the ferrule. Using this brush I applied "Rust Red" in a generous layer. You can blow off, brush off or wipe off excess - like I do in the next step.
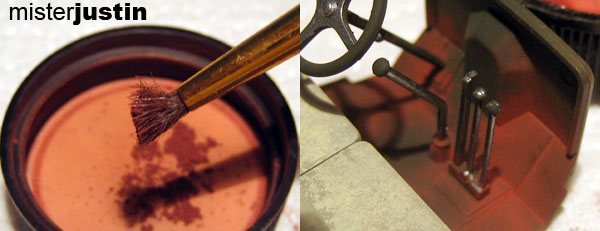
Using another cheap brush I applied some enamel thinner and wiped away a bit of the "Rust Red" powder. This also helps get the remaining powder into the recesses and will bind it more permanently to the model. In the image on the right I have added the "Rust Brown" powder.
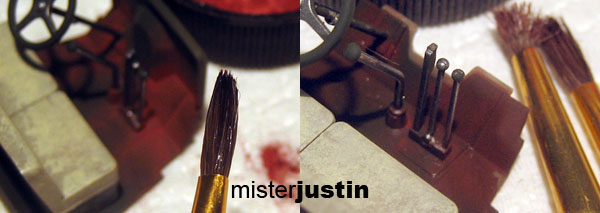
Application of more thinner (left) and "Dirt Brown" (right).
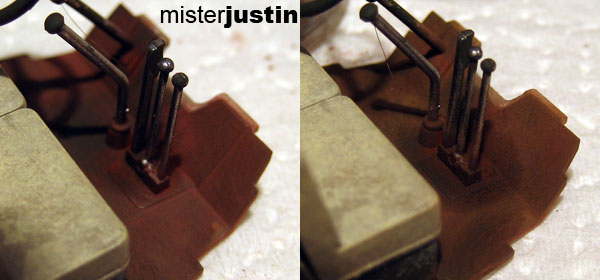
Application of "Grimy Black" gives us the finished image for the deck plate. In the bottom image you can see where I stippled the rust near where feet would kick getting into the truck. Always remember that corners will be more heavily weathered in most vehicles. I applied additional black, and then thinned heavily, where the driver's feet would rub.

These techniques and materials can be used to create incredibly realistic rust, dirt and grime and are very well suited to vehicles. Use them on engines, treads, bolts, hatches... anywhere you'd expect to find gunk and rust.
Next up... playing with oil!
First up is an introduction to weathering with pastel powders. I'm using "Doc O'Brien's" for this tutorial. I'm happy with the product, and you get a few colours it's harder to match with art store pastel sticks, but you can do this much less expensively with generic art pastels and some sandpaper.
This is the un-weathered cab. I have base coated the interior and painted the seats.
The colors I'm using are "Rust Red," "Rust Brown," "Grimy Black" and "Dirt Brown." I will use Testors enamel thinner sparingly as we go - and that bottle will likely last me several years.
I bought a $3 pack of crappy brushes to use with powders. I took one of them and cut it off about 10mm or 1/4" from the ferrule. Using this brush I applied "Rust Red" in a generous layer. You can blow off, brush off or wipe off excess - like I do in the next step.
Using another cheap brush I applied some enamel thinner and wiped away a bit of the "Rust Red" powder. This also helps get the remaining powder into the recesses and will bind it more permanently to the model. In the image on the right I have added the "Rust Brown" powder.
Application of more thinner (left) and "Dirt Brown" (right).
Application of "Grimy Black" gives us the finished image for the deck plate. In the bottom image you can see where I stippled the rust near where feet would kick getting into the truck. Always remember that corners will be more heavily weathered in most vehicles. I applied additional black, and then thinned heavily, where the driver's feet would rub.
These techniques and materials can be used to create incredibly realistic rust, dirt and grime and are very well suited to vehicles. Use them on engines, treads, bolts, hatches... anywhere you'd expect to find gunk and rust.
Next up... playing with oil!
Subscribe to:
Posts (Atom)