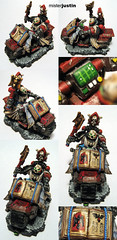
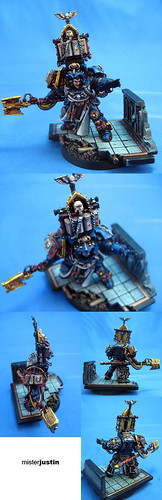
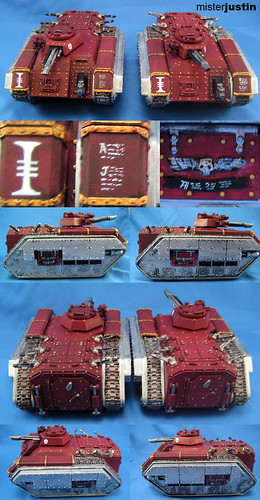
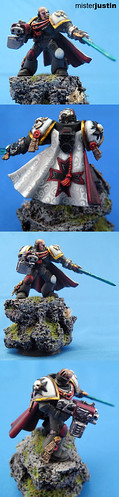
Nearly finished with this project - and it'll find its way to eBay fairly quickly.
I have the last of the weapons primed and ready to go. Having missed the Christmas shopping rush, however, I'm in no particular hurry to get it painted at this point.
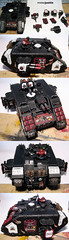
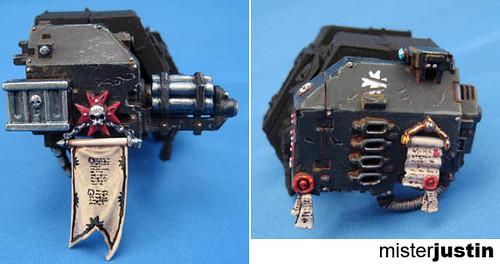
Everything is swappable so that it can go from a Land Raider to a Land Raider Crusader in just a couple of seconds. When I list it I'll make additional text and weathering optional.
Until then I'll be back to working on my ten tank armored company project...
Friday, December 28, 2007
Wednesday, December 12, 2007
Long time no update....
I have new photos coming sometime in the next week - including shots of my finished magnetic Land Raider to Land Raider Crusader conversion.
In the interim I thought that I would share a fun piece of news: I just submit a request for consideration to White Dwarf. I have a couple of article ideas that I'm hoping they'll review. I went through the submission guidelines and hope for some feedback if nothing else.
Would be fun. Here's hoping.
Tuesday, November 20, 2007
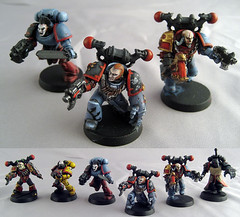
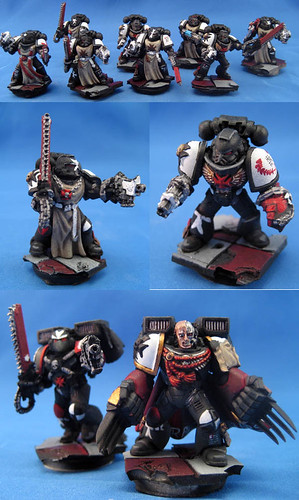
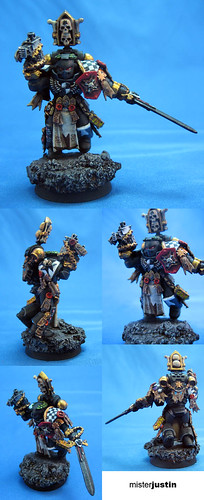
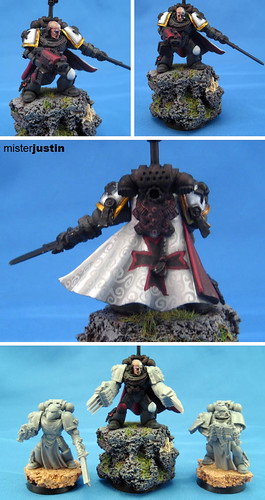
Smackdown Fallen Dark Angel
After putting together a Fallen Dark Angel with the new bits (and a 2nd edition backpack) I got the idea to include a whole squad of Fallen. This guy will now be leading a squad of five 2nd edition Marines.
The whole thing fits in well with my renegade theme and will add a bit of interest. Painting Dark Angels also saves me a bit of time as I've gotten black down to a pretty simple science at this point - this guy represents less than one hour painting.
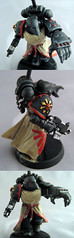
The whole thing fits in well with my renegade theme and will add a bit of interest. Painting Dark Angels also saves me a bit of time as I've gotten black down to a pretty simple science at this point - this guy represents less than one hour painting.
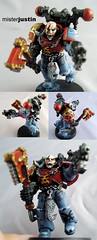
Smackdown Space Wolves
This is one of my renegade Khorne Marines - one of the ones that, unfortunately, won't be joining my Space Wolves Champion.
This is the only model thus far to break my two hour rule. I'm not much past two hours but spent some time going back in to redo the gold. I used some quick techniques to paint it the first time around and was really unhappy with the result. Knowing that I won't be happy with a quick gold I won't lose time on the next model.
Overall quite pleased and I think that this guy will work out well as part of the unit that Kharn the Betrayer will be joining. Not Berserkers, mind you, but a group of Khorne Marines.
Mmm, geekery.
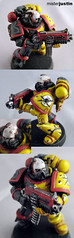
Smackdown Space Wolf Champion
My renegade Space Wolves Aspiring Champion. This guy will be leading one of the squads. He includes more loyalist bits than I'm likely to use elsewhere - but I really wanted to use a pair of the kneeling legs.
Unfortunately I made my other renegade Space Wolves in to units that will be included in a different squad. Oops.

Unfortunately I made my other renegade Space Wolves in to units that will be included in a different squad. Oops.
Smackdown-Imperial Fist 01
A WIP shot of my Imperial Fist renegade. This one includes a (very) minor conversion - he has one Chaos and one loyalist leg to help with the split scheme.
I am particularly happy with the skin tone and the blemishes. I'll probably make a quick tutorial on the blemishes in the near future as I plan on reusing the technique.
Still a ways to go on this one - but I'm keeping all of the SMACKDOWN miniatures under two hours of painting. The yellow, for those hobbyists in the crowd, was done with the new Foundation base coat and a flesh wash in the recesses.
Smackdown Army
Awhile back my middle brother won Games Workshop's "'Ard Boys" regional tournament and a pile of Chaos miniatures. This spawned the
DOOKS DIZZO SMACKDOWN CHALLENGE!
"Dooks Dizzo" being the handle he uses on a hobby/gaming forum we both frequent. The challenge was pretty simple -- he'll help me get an army together by providing some models; I'll paint them to my usual standard and have the whole thing finished by March '08. In March I'll fly up to Seattle and play three games against him.
If I fail to meet the deadline... well, life for me on that particular forum will be filled with mockery. The public nature of the challenge, and the fun of it, makes it much more likely that I'll finish.
So I'm going with a slightly themed army. Mostly recent Chaos renegades - so lots of loyalist bits and colours. The top shot shows three Space Wolves renegades (I just started the one on the left). The bottom shot shows the minis I've finished or am presently working on.
More to come...
Sunday, October 28, 2007
Then I brought out the Captasus, and we had to spend 20 minutes ooh'ing and ahh'ing over that. The GW staff guys were pretty blown away, really impressed with both the magnetic work and the paint job. Which required me to bring out my whole magnetic General kit (I was only using the Battle Standard Bearer in the game) and go through
that whole explanation, because only one of the staff guys had seen that model
before. Anyway, you're the hero of a bunch of GW Staff on the North Shore of Massachusetts, for whatever that's worth. -- Chris

Sunday, October 21, 2007
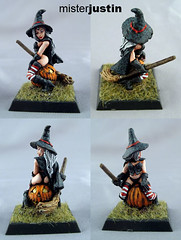
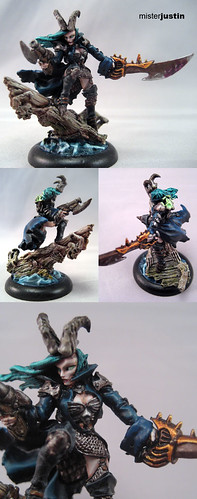
Elise The Witch
I decided to paint a fun little holiday miniature. This is an old Haloween model from Reaper - and I'm glad I bought two of them. Lots of fun to paint and it'll be a fun piece to have in the display cabinet.
HAPPY (early) HALLOWEEN!
HAPPY (early) HALLOWEEN!
Tuesday, October 9, 2007
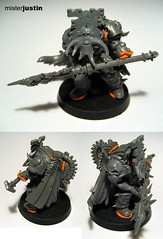
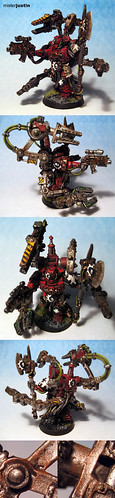
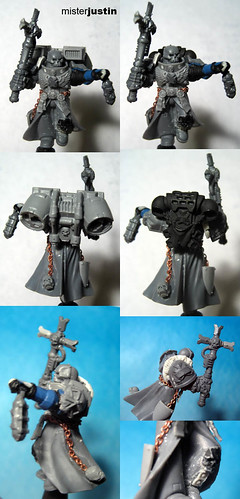
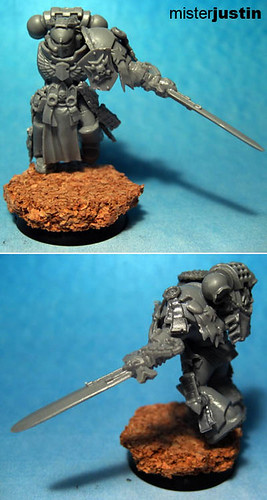
Khorne Terminator Lord 01
My Chaos Terminator Lord and Chaos Spawn kits arrived today... and I immediately (read: as soon as I got home) pulled out the sticky goo and started in on ideas for my Khorne Lord conversion.
The right arm (his) is an Ork arm. I like the *idea* of exposed flesh on this guy and the arm is the only place I can think of. I would swap out hands to have the haft of the weapon in both hands.
The weapon would be replaced with a sculpted Daemon Weapon - something more halberd like than ax like.
The spine on his back I would cut and bend to fit the contour of his cape.
I have *considered* the idea of sculpting a chain cape for him -- or using putty and real chain, anyway, to achieve a more Khorne-like effect.
Sunday, October 7, 2007
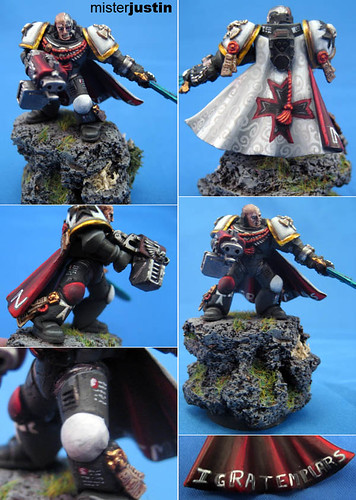
Blood Raven Chaplain 05
At this point I'm getting very close to finished with him. I am quite pleased with most of it *BUT* do plan on making some changes:
- Add some pinkish-white to the chipping on the red paint
- Chip the backpack exhausts
- Add mud to the crozius
- Highlight the backpack
- Fix the dozen tiny things people will spot that my tired eyes have missed
Thursday, October 4, 2007
Blood Raven Chaplain 04
I've skipped blogging the previous three WIP shots on this guy - and wasn't going to post him until he was finished - but as I'm becoming happier and happier with the results... well, I had to share.
This bad boy is still only at the 50% mark and I'm a bit daunted by how much I have to complete in order to get this guy to the level of painting I'm trying to achieve. It's getting more and more tempting to take shortcuts and speed things up.
I'm tempted to pick up another project for awhile, and come back to this one afresh, but then I worry that it will languish on a shelf for weeks (or months) before I pick it up again. So I'll keep plugging away and stab myself in the eye with a paintbrush every time I catch myself taking a shortcut.
Friday, September 28, 2007
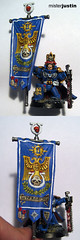
Ultramarines 2nd Company Standard Bearer
Still not the best photo - as I haven't set up the photo box in awhile - but I'm getting pretty near to finished with this guy. I'm going to set him aside for awhile as I'm a bit burned out with him.
The tutorial I wrote for the banner is up on the Relic Forum - Tutorials board.
The tutorial I wrote for the banner is up on the Relic Forum - Tutorials board.
Saturday, September 15, 2007
Before/After - Ultramarines Standard Bearer 01
The photo isn't the best but I wanted to give a before/during shot of my standard bearer. There's still a long way to go before he's finished -- not counting the banner -- but I'm quite pleased so far.
I added the 2nd Company icon to his leg today as well. The process was identical to the cape... only smaller. There is still some clean-up to be done on it, and lots of highlighting on the blue, but here he is so far...
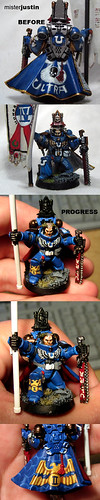
I added the 2nd Company icon to his leg today as well. The process was identical to the cape... only smaller. There is still some clean-up to be done on it, and lots of highlighting on the blue, but here he is so far...
Friday, September 14, 2007
Competition - Imperial Guard Psyker
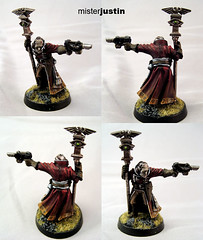 I've jumped in on another of the Relic painting competitions. This time I think I actually stand a chance.
I am very pleased with the colour and highlighting on the red coat, the glowing effect on the green eyes, and the sallow colour of his skin - especially the shading. I used Chinese hexagramatic icons for the wards on the hem of the coat - with weathering to blend the whole thing together. Other than black and white for highlights and shading this is also the first time I've used only three colours on a model.
The base leaves a bit to be desired but I haven't gotten motivated enough to do anything about it.
I'll post an update when the results are in at the end of the month.
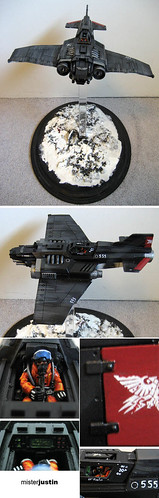
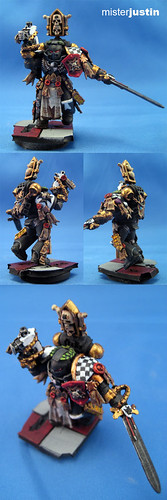
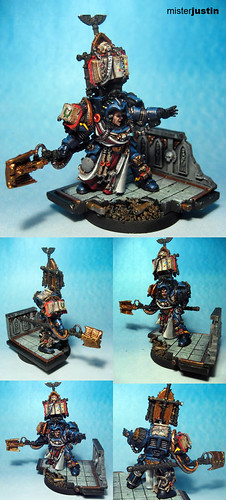
Capasus Commission - Finished
This is probably my most elaborate commission to date. While I have done larger models, with more detail, this was the first full conversion and paint job on commission.I know that I've detailed the model in other posts - but I'll recap here: The wings and all of the weapon arms magnetically attach. You can lift the model by the wings or the lance - although it should, of course, be moved by the base. He has STRIPY PANTS, with which I am very happy. There is freehand on his legs and checks on much of the cloth.
This one shipped out this week and, much like my original magnetic general, I'm sad to see it go. The fella I painted this for went to great lengths to find me in order to get this model though and I'm glad I could meet his expectations.
Thursday, September 13, 2007
Tutorial Update
I posted a new freehand tutorial,Ultramarines 2nd Company icon on a cape, on the Relic forums as part of the freehand banner contest.
Thursday, August 30, 2007
Commission Thunderbolt Finished
 This long time project is finally finished, packed and out in the mail to Niroe. Although I started his Valkyrie first I still have that one on the table - it should also be finished this week.
Although the snow wound up a bit thicker than I had intended I'm still pleased with the base on this one. The model uses more rare earth magnets to attach to the base.
This was also the first time I'd put my trust in to decals and tried the gloss coat/decal/gloss coat/paint method that I have recommended to so many others. Turns out it works just fine... which I suppose I knew. I simply hate applying decals.
There are a lot of detail shots for this guy floating around and I'll see what I can do about putting together some better composite images.
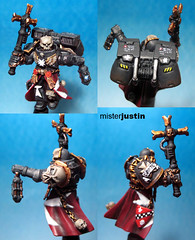
Commission Tech Marine
 Commissioned Black Templar Tech Marine that I'm pretty darn happy with. I'm going to go in and clean up the BT icons on his shoulder and knee but otherwise think that he turned out quite well.
I am especially pleased with the armour chipping and the limited rust on the exposed metal of the servo backpack. The rust was accomplished using the "Rust All" product which I'm becoming happier with the more I use it.
I'll get some better photos online the next time I break out the light box. The blending and highlighting on the red don't come through particularly well in these shots - although you can see some of it in the third photo down.
Green and blue were chosen as the split contrast colours for the red on this one. I did not, however, make any specific attempts to apply them as spot colours.
Friday, July 13, 2007
 It's been awhile since I updated my Leman Russ project so I thought I'd post another WIP shot. I did the snow on this one at the same time as the Thunderbolt base... and managed to get the snow weathering BACKWARDS on the treads. Oops. Note that all of the snow is at the FRONT of the vehicle and not the back. I'll be fixing that shortly.
I also intend to add mud to the tracks, undercarriage and track marks - as well as water effect to the engine compartment to show where snow has melted on the hot metal.
I had originally planned to add several guardsmen slogging along behind the tank. I'm going to save those for another project and just get this one finished so that it's not distracting me much longer. I have far too many big projects on the table right now.
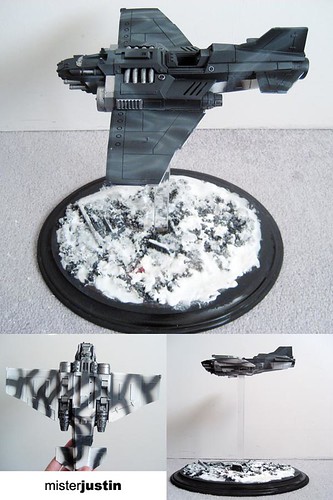 An early update on the Thunderbolt project.
I am quite pleased with how the split urban camo scheme worked out - although I think that the snow on the base is a bit thick.
There is still a lot of work to be done, of course. I'll add all of the detailing, weathering, chipping, wind streaking along the wings... some techniques that I've never applied before. This project has been a real pleasure and I intend to re-use the base idea for every future flyer.
Monday, July 9, 2007
Flyer Display Stand for Forge World Thunderbolt

Materials:
Wooden Base - craft store
3/4" x 10" square acrylic rod - plastics shop
Glue, gravel and base materials
1/2" rare earth magnets - K & J Magnetics
Two part plastic to anything epoxy
I measured the base to find the center and simply epoxied the bejebbus out of the rod. I added two of the 1/2" magnets to the top using the same epoxy and one of them to the bottom of the Thunderbolt.
After the epoxy was dried (I waited 10 minutes) I went back in with my gravel and debris.
I was hoping that the magnets would be just strong enough to allow me to lift the entire display, base and all, by the flyer. It's not. It's strong enough to survive the customary bumps that come with life on a shelf.
More Fun With Magnets
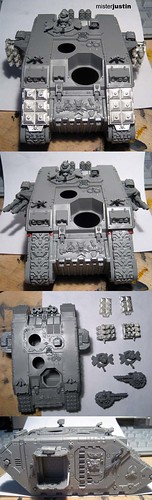 High temperatures recently have made it impractical to paint, and impossible to prime anything, so I decided to jump in on putting together a new model. Right away I knew it would be my new Land Raider but I couldn't decide whether to put it together as a plain ol' Land Raider or as the fancy Land Raider Crusader... which got me wondering why it had to be one or the other.
Thank you rare earth magnets.
I put together the body in the normal fashion and embedded four rare earth magnets (1/8" x 1/32" each) in to the top sponson mount on each side.
I cut the top pivot from each of the sponson weapons and added magnets there instead -- two each to the Crusader sponsons, because they're metal, and one each to the standard plastic weapons.
The red dots on the front helped me mark where to embed the tiny 1/16" x 1/32" magnets to hold the Crusader frag launchers in place. There are six of the tiny magnets in the body and three in the launcher... for each hole. The more magnets the better the hold - and I can hold this thing upside down without anything falling off.
The pintle gunners will be swappable as magnets won't really work there. I will also make the front mounted guns swappable once I order a second housing.
When I'm finished it won't take more than a few seconds to switch between a Land Raider and a Land Raider Crusader.
Of course I don't have one in my 750 point army list but it will still be a pleasure to paint... as soon as I'm done with at least one other project.
Tuesday, July 3, 2007
Army Blog Update - Black Templar
 The only vehicle in my 750 point army list - this one lone Razorback is going to need to find a way to get across the table and deliver my only shooty Marines. Good luck with that, little Razorback.
Despite being cannon fodder I'm pretty pleased with the vehicle. Having decided to redo my army if I decide to keep playing I went ahead and put more effort in to the only vehicle. I can field it as it is and be happy with it and put more detail in later - although I think I'm going to break my own rules and do some of that detailing now.
It's getting harder to keep on track with this 750 point army. This is especially true when I want to go back and completely redo so many of the miniatures. Ah well, tabletop first....
Army Blog Update - Black Templar
 The first eight of my Black Templar Initiates are finished. Each is standing on one of the resin cast bases I made for this army. BT symbols on the helmets are very much in evidence - although I have otherwise kept detailing to a minimum to help me get this army on the table.
Included at the bottom is the Marshal complete with his magnetic lightning claws and my Assault Marine test model. I have a pair of the Assault legs magnetized and ready to paint - that will let me swap the Marshal either way to match current and future lists.
Of course now I plan to completely recast my bases... but that a topic for another post.
Wednesday, June 27, 2007
 This guy is finally finished. I have him sealed, set aside, and ready to use with my army. He is sitting on one of the bases I made for my Black Templar army - and I've added a white casing to his bolt pistol to make him match the squad he'll attach to.
 It's nice finally seeing some progress on this project. The idea that I might actually get an army on to a table in July is starting to seem like a reality. A very geeky reality.
Friday, June 22, 2007
Competition Entry: Warmachine - Skarre
 This is the next competition piece for my local gaming store. This is also my first Warmachine model.
I left off the backpack skulls as I thought that they were really, really silly. The only thing I did to set this one apart otherwise was add glue to the base to simulate water.
After reading the card she comes with I really aimed for a sea witch feel. I wanted her to blend in to the ocean - with only hints of the daemonic energies that keep her afloat.
Unfortunately, once again, I have seriously under powered lights. There are six layers on the blue of her coat and no actual black. Boo hoo. I fiddled with levels (you can tell looking at the blue background) in the various shots. Someone suggested that I use the grey background instead of the blue. I'll try that and post new photos if it's an improvement.
If I understand the competition practice correctly I should know about this one in two weeks.
UPDATE: I replaced the image with a grey background version - much improved.
Saturday, June 9, 2007
Product Update: Maybe
I just finished pouring silicone over my first batch of truly marketable bases. My previous bases had all used the GW plastic rounds as a starter - these use rounds I picked up from the local plastics shop.
I spent about three hours sculpting, preparing and now moulding these. Each matches a ruined temple theme: damaged 1 meter tiles and rubble. I kept them simple, clean and, I feel, dynamic without the worry of having the base distract from the miniature.
I plan on basing my Black Templar army on these bad boys...
Assuming I didn't mould them with a fatal flaw.
I won't know until tomorrow morning whether I have a new batch of bases... or simply wasted silicone.
Here's hoping....
UPDATE: All ten bases came out just fine. I have twenty cast and ready to use for my first squad of Black Templar. I'll get a photo of them up some time next week.
Monday, June 4, 2007
 Still some clean-up and highlighting to do, otherwise I'm pretty pleased with this guy. Like the Marshal and Emperor's Champion he's being done to a high gaming standard so that I can get him on the table. Unlike the previous command models this one was actually quite a conversion, of course, and I hope to go back and give him some proper painting attention later.
I'll finish out the crozius with a red handle and add some more white to the skulls. I will probably also go in and add some shading to the white on his robes... but we'll see whether I do that or start in on the squads next.
All-in-all quite pleased with how the army is coming along; even if I only have three models on which to base my opinion.
Sunday, June 3, 2007
Terminator Librarian - First Place!
 I went back today for the monthly painting group at the local store and found out this fella had taken the win on the competition from last month... with all but one vote!
That makes him my first win and the first piece I've had in the display cabinet.
Points on which I'm told he won:
- Flesh and character of his face
- Freehand on the books
- Text "LUX OCCULTA" on the bookmark
- Source lighting on the armour
I got more feedback about how he could have used some OSL from the staff -- and, unfortunately, you can still only see the lighting effect in the first photo. Even in the light box the highlights just look like glare since that's where the light actually falls.
His right knee is still blank since I'll probably send this guy to eBay eventually and add whatever chapter badge by request.
Thanks to everyone that provided feedback.
If anyone still wants additional close-up photos just let me know and I'll see what I can do.
YAY!
Black Templar Emperor's Champion - Final
 The finally final version of the Emperor's Champion for my Black Templar army. This model was made using 100% off the sprue parts with no actual conversions.
Most of the bits are from the Black Templar sprues - with the exception of the chest: command sprue company champion and the legs: assault marine sprue. The base was made with cork and gravel... which I will replace when I cast my new line custom of resin bases.
Done to a high gaming standard for use in my 750 point Black Templar army. With this fella done, and the Chaplain/Reclusiarch nearing completion, I should be working on my squads in the next week or so - commissions permitting.
Wednesday, May 23, 2007
 I got a lot of feedback on this guy when I posted him to a couple of servers and this prompted a number of changes:
- Replaced the sculpted chain with actual chain
- Added the skull and shield to the chain
- Replaced the off sized arm on the crozius
- Resculpted the decoration on the left leg
- Sculpted TEMPLAR on to the right pauldron
- Resculpted left hand to be closed instead of pointing
- Modeled with magnetic backpacks in place
I'm quite pleased with the changes for the most part - but now I can't decide whether or not he needs any additional purity/crusade seals. I am particularly ambivalent about the ones I had on his neck. I like the idea of adding long flowing seals, like vestments for this chaplain, but do have to agree that the last round was overkill.
Sunday, May 20, 2007
Black Templar Chaplain/Reclusiarch conversion
 Playing with conversions today and got this guy to a point I'm happy with. There's still some greenstuff work to come -- going to give him vestments and do something on his legs.
No backpack on him at the moment as I will make it magnetic so I can swap those with the Marshal. He'll wind up being able to use one of the jump packs or the BT backpack.
This fella also took with him a big chunk of my thumb and left a long gash in one of my fingers. Everying people tell you about appropriate use of sharp craft blades is true. Go figure.
Tuesday, May 8, 2007
Commissioned Forgeworld Valkyrie
 This model had been the bane of my existence thanks to a 2mm gap that I couldn't get rid of. Problem finally solved I've gotten the model together and finally started to be able to show some progress.
There's still a long way to go - including a simple display base - but I'm glad to be working on it again. For awhile it simply made me cry.
Commissioned Daemonhunter Chimeras
 A pair of Tier 1 Chimeras to match a Daemonhunter army. These bad boys will transport the Stormtroopers in CancerMan's (Relic forum) army.
The freehand was added when the project came in under the allotted time. Overall I'm quite pleased and got the green light today.
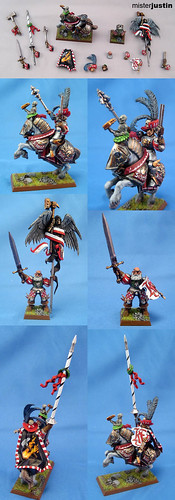
WFB Project - Capasus Conversion
 I've started in on a WFB conversion project - creating a pegasus captain, a Capasus (hey, I don't make this stuff up), based on the Empire General model. This one will have magnetic arms in the same fashion as the Empire General I did awhile back.
At this point the model includes pins in both legs 1/4" in to the leg and 1" in to the base. After I finish the conversion I will glue the model in place and add a weight for additional stability. I will also add rock, sand and vegetation to the base for additional depth.
This has been a fantastic break from my other current projects as I don't do much Warhammer Fantasy. It has also been nice to have a conversion to work on when I'm too tired to paint.
More on this one as other projects start to wrap up.
Friday, April 27, 2007
Tuesday, April 17, 2007
Army Blog Update
Scorched Archive is a new 40k resource created by Andy Pearson. He has some good ideas and really wants to create an article based community for hobbyists to share tips, techniques and thoughts with the hobby community.
I was invited to participate and will be double posting my tip/technique articles there -- but have moved the army blog, chronicling my (attempt to) return to the gaming table, over to the SA web site. The first post is up now and provides some background on the project.
Hobbyists: keep your eyes on this Web site; good things will come of it.
Friday, April 13, 2007
 After entering in the Relic painting competition I was inspired to try another model -- this one is for a local competition. Everyone has one month to paint this bad boy; he's due the first Sunday in May. I'm probably 75-80% finished already but want some suggestions on the force staff.
I've tried to do source lighting again -- not object source (OSL) -- and highlighted the armour as though the light were slightly forward and on his left side. When I get him in to the photo box this effect should show up better. It is most visible on his pointing arm where it's nearly black except for the light blue on the top.
Wednesday, April 4, 2007
 I am finally ready to call this model finished.... for now. There are still a lot of things I would like to change, and I may still add some blood and gore, but I'm rather satisfied with the end result.
For a first run with Non Metal Metallics (yes, the yellow bits are supposed to be gold) I'm more than satisfied. My NMM steel could be a bit better but I'm sure it will get there with practice.
I had considered selling this one -- but I don't think that I will be able to part with him for awhile. For now he's going to sit upon my shelf.
 This is the final image I'm using for the Relic painting competition. Once voting is up I'll get a link to the page -- although I think that it's going to be a very, very tight competition. I am quite pleased with the result and am glad to be able to set this guy aside for awhile. If it weren't for the competition I'm sure I would have cut more corners and settled for less -- as it is this will be a piece I'm glad to see on my shelf for awhile.
Wednesday, March 28, 2007
Friday, March 23, 2007
 I'm so close to finished that I can taste it. It is delicious! I'll be very glad to set this model aside for awhile and get back to Kharn and my display tank.
I'm pleased with the overall result but still a bit disappointed that he's not on the same level as the Kharn model. I expect this guy and a couple sets of arms to find his way to eBay once I get a new commander put together for my 750 point list.
I still need to finish highlighting the armour and detail the sword -- otherwise I think that this guy is ready to go.
I've seen a couple of the other entries for the competition now -- and while I know I don't have much of a chance I'm still glad to be entering and competing. I've learned a lot between this and the Kharn model; both of which were intended for this competition and both of which got more attention that my usual efforts.
One week from tomorrow....
Wednesday, March 21, 2007
Black Templar - Army Blog Update
 I got home too tired to really paint tonight so I decided to do some modeling for my army with the few BT bits I have on hand. Having made the two test models that I debuted with my magnetic commander I was, however, out of Black Templar torsos.
I found a Company Champion torso in my bits box and decided that it was perfect usable in my BT army - and perfectly unique enough in the scheme to fit for a character model. And so... here is the "Emperor's Champion" model for my 750 point Black Templar army.
My goal with the army is to use only existing GW pieces off of the sprue with no conversion, no sculpting and no plasticard additions. I really want to see what the GW plastic models are capable of... and so far I'm pretty happy with the results.
I'm waiting on a bits order to get the BT bolt pistol for his right hand. I will use one of the BT shoulders on that side and, of course, more decorative bits. So far he's up to 11 purity/crusade seals -- and I found a BT backpack topper in my bits box.
Of course I'm so happy with this piece that I will probably make a new body for my magnetic commander. If he's going to be the centerpiece of my army I figure he ought to be at least half as bad ass as this guy.
Tuesday, March 20, 2007

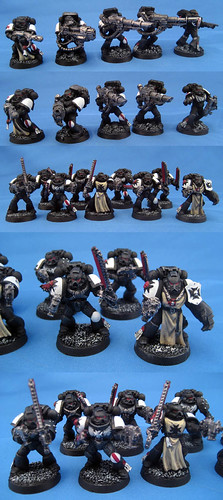 Final image on a squad of Black Templar Crusaders and three heavy weapons. These were done to the Tier 1 standard and I think are very representative of work at that level. I will actually use shots of these guys when I update the commission page to show examples.
Ultimately I'm pretty pleased with them and plan on fielding my own Black Templar army at a similar painting level.
Now it's back to trying to find a scheme for Niroe's flyers that will do justice to the incredible detail that Forgeworld saw fit to model.
Monday, March 19, 2007
 I finally (finally!) have an update image on my magnetic Black Templar commander. This is the model that I will be entering in to the Relic competition (with only 2 weeks to go, eep!) -- and what will become the centerpiece of my 750 point army.
Yup, I'm finally (finally!) going to give playing a try again. The last time I played we were all being amused by the new 2nd edition rule set. Ah, those were the days. So now I have a couple of 750 point lists drawn up and hope to hit the tables this summer. The last shot in this image shows the commander with twin lightning claws next to two test models.
The next image is just a sample from the Black Templar dreadnought I've been working on. I haven't done anything but the two weapons -- and I'm not sure I'll use them if I actually build a list.
Regardless of whether or not I wind up fielding this army I think it'll be a good exercise -- and if nothing else it will be good practice.
Friday, March 9, 2007

I redid all of the NMM gold -- I have also done the bulk of my NMM steel. I do intend to go over the chains with some rust and dirth but only when I'm ready to weather the whole model.
The 40 mm base was made from Super Sculpey.
Still a bit of work to do including the gun, axe, finishing the backpack and general clean-up and weathering. I hope to finish him today so that I can get back to my competition entry... which I haven't touched since I picked this guy up.
I'm in love....
While working on the Kharn model I decided to put together a wet pallete to help with the NMM blending. I took an old blister pack, cut a sponge, and picked up some baking parchment at the grocery store.
Now I'm in love.
The paint not only stayed wet while I was working on the model for more than an hour -- but when I came back to the den after dinner and a movie... yup, most of the paint was still wet.
For any blended colours this technique is going to be invaluable.
Thank you, internet!
Now I'm in love.
The paint not only stayed wet while I was working on the model for more than an hour -- but when I came back to the den after dinner and a movie... yup, most of the paint was still wet.
For any blended colours this technique is going to be invaluable.
Thank you, internet!
Tuesday, March 6, 2007
 This is the first actual WIP image for the model. And, so far, some of my best work to date. This includes extensive layering on each colour and non-metal metallic (NMM) gold.
This is my first foray in to the world of NMM and while it was a pain (and I'll do it differently next time, of course) I'm pleased with the overall result.
More to come -- but I finally feel like I might actually compete with the other folks in my tier.
[UPDATE: Denied! I will not be able to enter this model in to the competition - I did too much work on him for everyone to feel comfortable beliving that it's only 2.5 hours - or started *after* the competition began. So back to my original model.]
News and updates....
I thought that I had already posted this but a search of the posts didn't bring anything up, so....
I have entered my first painting competition. The competition is for single infantry miniatures on a 20-40mm base. Entrants are divided in to two levels -- and I have been placed (so far) in the higher tier.
I had originally entered my magnetic Black Templar commander -- but just posted a request to change models. I'm not all that pleased with my progress on the BT model whereas last night I did my best work to date... on Kharn the Betrayer. I am very inspired by the work I've done so far and really want to get this model finished.
Of course the entire thing is a bit humbling when I see the list of names in the higher tier. I will be competing directly with some of the folks whose work freqently leaves my eyes wide with wonder. On the plus side being grouped with these folks is enough to make me walk away happy with the whole experience -- even if my odds for actually winning are rather low.
I hope to be able to do a bit more work on Kharn tonight and will post a photo as soon as I can.
I will also have commission photos to post later this week -- and added a couple of links to the gallery today.
I am also working on getting the archives up and correcting the display issues on label and archive pages.
Tuesday, February 27, 2007
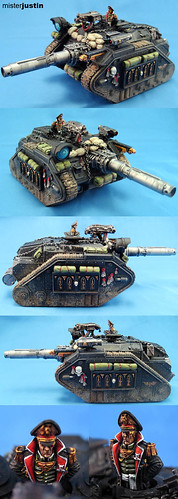 Another piece for Bill's armoured company. This is his conversion and I think that it really came together. If you're going to put a Commissar in a tank then that tank needs to be able to blow the bejesus out of other tanks -- and this can do just that. Quite the intimidating piece of equipment.
This one was painted to the Tier 1 standard -- but with all of the detail on the model I think that it really pops even at that level. Just a superb model.
Friday, February 23, 2007
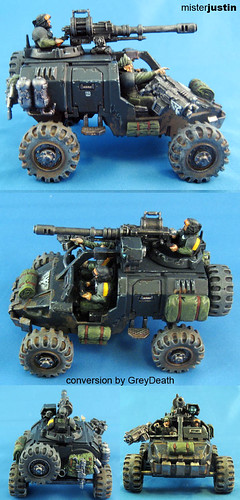 Unless I get change requests back from the client this one should be ready to go. The conversion work was done by GreyDeath of the "Work In Progress" forums -- and the commission was for a Tier 1 (aka gaming standard) paint job.
I put some extra work in to the body of the jeep because it was 1) a real pleasure to paint and 2) good practice for my weathered black.
The mud glaze was done a bit thick intentionally as I thought a gun jeep would have a bit more than a touch of dirt in the corners. On a Tier 2 model I might have gone so far as to glue "mud" along the lower portion of the jeep if the client wanted it.
In the end quite pleased with the result. I hope the client is as well.
Saturday, February 17, 2007
 I'm going to post this guy on a couple of forums for some final feedback -- but I think he's finally ready to make his appearance on eBay. I have to say that I'm glad to have the project completed.
I am really pleased with the results of the magnets though. I already have four right arm options for the BT commander that this model inspired. I suspect that it will be very easy to get carried away creating combination options.
Subscribe to:
Posts (Atom)