Pages

Tuesday, June 30, 2009

About my commission work....

I am currently accepting commission work. I quote a firm MAXIMUM cost prior to starting work. If I go over there is no charge for the extra time - if I'm under my estimate you keep the difference.

All of the models I paint are individually painted and detailed - I will never "dip" or mass drybrush your models. My goal is to give you something I'd be happy to have on my own table every time. Even "lower tier" models get layered highlights and detailing.

Check out the "Testemonials" label to see what folks have said about working with me -- and the pieces below are fair representations of what I do on commission these days.

If you have a project you'd like to discuss please email misterjustin at gmail with the information. I'll get back to you as quickly as I can and, if you like, get a current or former client in touch with you so you can talk to them about their experience.


Thursday, June 25, 2009

Tau: Pathfinder Shas'Ui

I got this guy as part of the miniature exchange on the Relic forums and am entering him into the exchange competition.

I decided to weather Shas'Ui only slightly but to really go to town on the shield drone. I figured the shield drone would be old, weathered and pretty damaged from soaking up shots. I didn't repair the gap in his power line only because I'm a lazy git. This was my first Tau and I really enjoyed painting him.

Tuesday, June 23, 2009

Hello Toycutter

This is just a quick hello to anyone coming to the site for the first time via TOYCUTTER. Thanks for the write-up of my commissar!

http://www.toycutter.com

http://www.misterjustin.com/2009/05/commissar-01.html

Monday, June 22, 2009

Quick Tip: Brush Tub


From the Warp asked the hobby blogger community to submit "your one best painting tip." Mine isn't strictly painting but since it's my most shared tip RELATED to painting I'm putting it forward for the thread.

The photo is a three cavity painting tub. I picked this one up at Michael's Arts & Crafts in the USA for $1.99 -- although I wasn't able to find one on their website. It is, without exception, the only thing other than paints, brushes and models that I think every hobby painter MUST OWN.

This will extend the life of your brushes dramatically. Add a bit of brush cleaning soap - some people use regular dish soap - in the big chamber and it's even better. If I had to give up all of my fancy gadgets and tools but for one this is what I'd keep.

Friday, June 19, 2009

Quick Tip: Gloss vs. Flat Sealer

A gloss sealer will give the model a smooth, glass like finish; a flat or matte sealer has a rougher texture. But Gloss and flat sealers do more than change the finish on a model.

For instance, decals are easier to apply, and will last longer, on a gloss surface.

Here's a quick breakdown of which surface is better for various techniques:

GlossFlat/Matte
Overall washesOil filters
DecalsPanel line washes
Protect acrylicsDrybrushing
Oil filter (dot method)
Pastels/Pigments

Knowing which sealer to apply for which technique will help you decide in which order to apply weathering techniques.

For instance you should always apply a gloss layer before and after applying decals. However putting gloss over pigments/pastels will likely make most of your effort disappear.

Monday, June 15, 2009

GM 2.5 ton 01

It's time for an update on the 2.5 ton truck:

Although not strictly accurate I'm going to paint the canvas over the cargo as an American flag.

The truck was painted using the oil filter and pigment weathering methods - the latter of which I've already posted a tutorial for. I hope to have the oil filter tutorial finished shortly.

There will also be a generous coating of mud in place before the model is finished -- complete with a mud tutorial.

Mmm, it must be tutorial season....


Friday, June 12, 2009

Weathering With Pastel Powders

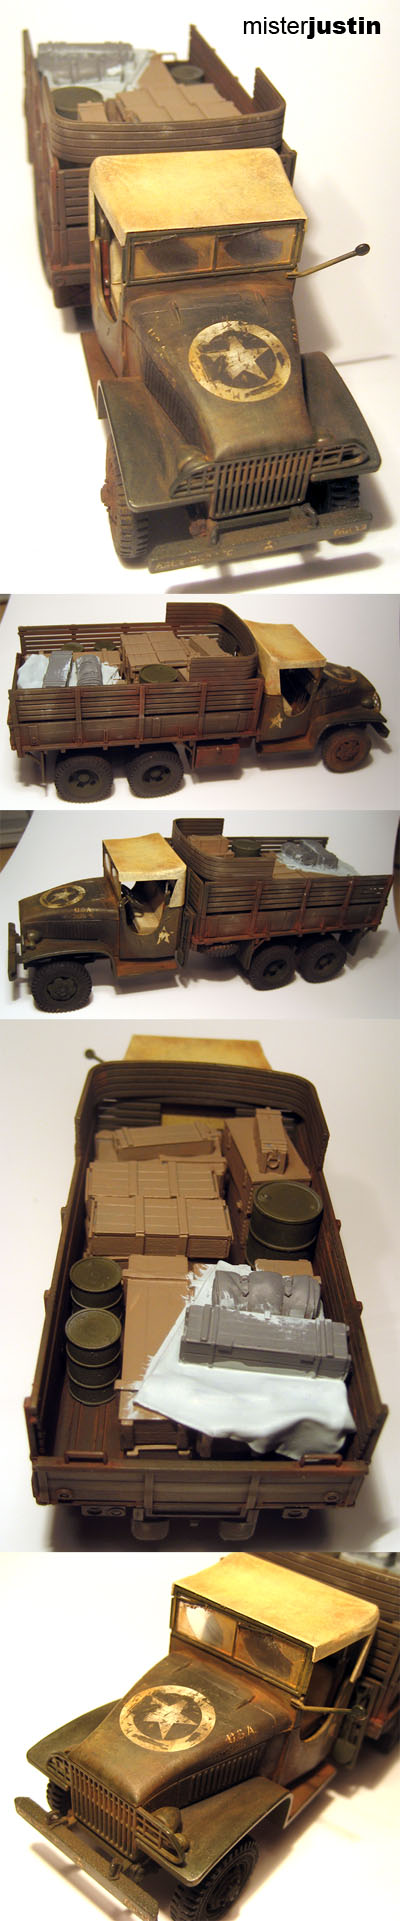
While considering which weathering tutorials to write up and where I would start I realized I have a Tamiya 2.5 Ton Cargo Truck sitting on my desk. Although it's not a 40k I'm going to use most of the techniques in my arsenal to get it finished and realized this made it the perfect tutorial project.

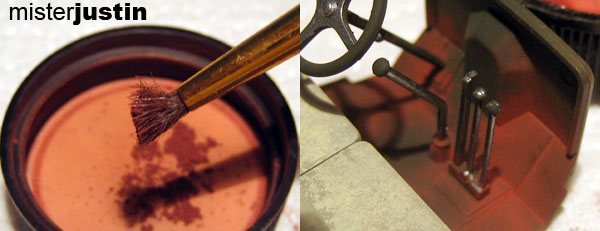
First up is an introduction to weathering with pastel powders. I'm using "Doc O'Brien's" for this tutorial. I'm happy with the product, and you get a few colours it's harder to match with art store pastel sticks, but you can do this much less expensively with generic art pastels and some sandpaper.

This is the un-weathered cab. I have base coated the interior and painted the seats.


The colors I'm using are "Rust Red," "Rust Brown," "Grimy Black" and "Dirt Brown." I will use Testors enamel thinner sparingly as we go - and that bottle will likely last me several years.


I bought a $3 pack of crappy brushes to use with powders. I took one of them and cut it off about 10mm or 1/4" from the ferrule. Using this brush I applied "Rust Red" in a generous layer. You can blow off, brush off or wipe off excess - like I do in the next step.


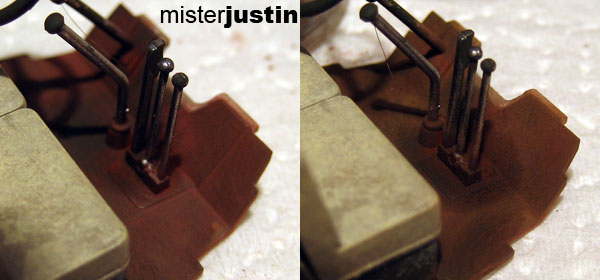
Using another cheap brush I applied some enamel thinner and wiped away a bit of the "Rust Red" powder. This also helps get the remaining powder into the recesses and will bind it more permanently to the model. In the image on the right I have added the "Rust Brown" powder.


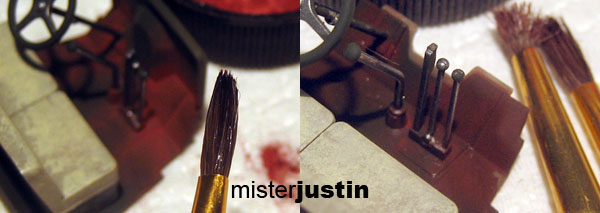
Application of more thinner (left) and "Dirt Brown" (right).


Application of "Grimy Black" gives us the finished image for the deck plate. In the bottom image you can see where I stippled the rust near where feet would kick getting into the truck. Always remember that corners will be more heavily weathered in most vehicles. I applied additional black, and then thinned heavily, where the driver's feet would rub.


These techniques and materials can be used to create incredibly realistic rust, dirt and grime and are very well suited to vehicles. Use them on engines, treads, bolts, hatches... anywhere you'd expect to find gunk and rust.


Next up... playing with oil!